
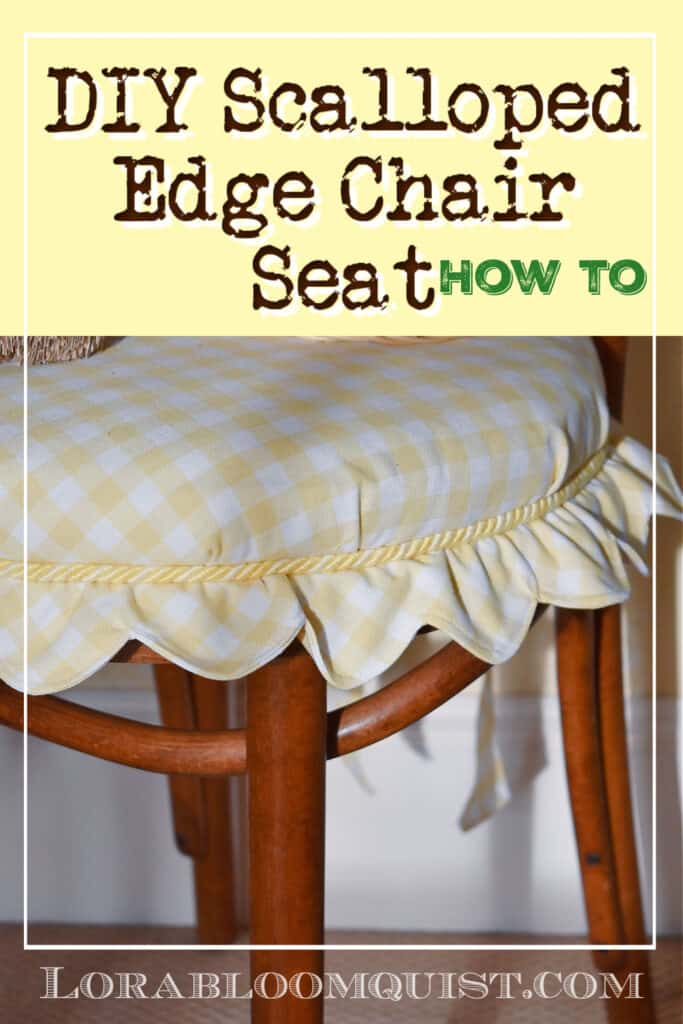
DIY Chair Seat with Scallop Edge
What can you do with an old chair? Revive it with a DIY chair seat that has a scalloped edge. This cottage style decor accent will add charm to any corner of your home. Here’s the how to.
Anyone have an old chair laying around you don’t know what to do with? Today’s post will make you happy you didn’t give it to the garbage man! A single, odd chair can add charm to any corner of your home. Here’s how I gave one of my old chairs a makeover and how I’m using it to decorate our home. I hope this DIY Chair Seat with Scallop Edge inspires your ideas!
Today’s post is part of our monthly Pinterest Challenge series, dreamed up by Cindy at County Road 407. Each month Cindy chooses a seasonal inspiration pic and a group of talented bloggers designs around it, each with our own style. We have fun and you get lots of ideas!

If you’re visiting from My Wee Abode, I’m sure you enjoyed Julie’s great ideas for decorating a small entryway. I struggle with the same issue and always appreciate space-challenged decor ideas! I’ll have all the rest of today’s inspiration at the end.
The Inspiration Photo
Today’s inspiration pic comes from the beautiful blog of Jamie at Anderson and Grant. Jamie explains how decorating doesn’t have to be an all-out deal. She shows how easy it is to create a Simple Spring Vignette that can add seasonal beauty to any corner of your home.

Design Features:
- Old chair
- handled basket
- tulips
- bunny
- lacey throw
- near an old white cupboard
- near a door
- lightswitch 🙂
I’m guessing Cindy chose this picture to give us an easy vignette to create. But of course I over-complicated things by needing to do a DIY project! So much for a “simple Spring vignette”! Before I get to the decorating part, I needed to revive the old chair I wanted to use.
When I saw Jamie’s chair had a woven caned seat, I remembered a bentwood chair I had that needed a new seat. This challenge was a great excuse to give my chair a new look! Here’s how you can give cottage-style charm to an old chair and how you can decorate with it.
DIY Chair Seat with Scallop Edge
For your convenience, this post contains affiliate links. If you make a purchase, I may receive a commission. There is no additional cost to you. My full privacy policy is here.
How to Reupholster an Old Chair Seat
Reupholstering old chair seats is a simple job. All you need is an electric staple gun, pretty fabric and foam for padding. Here are the steps I took to give this old bentwood chair a new seat.
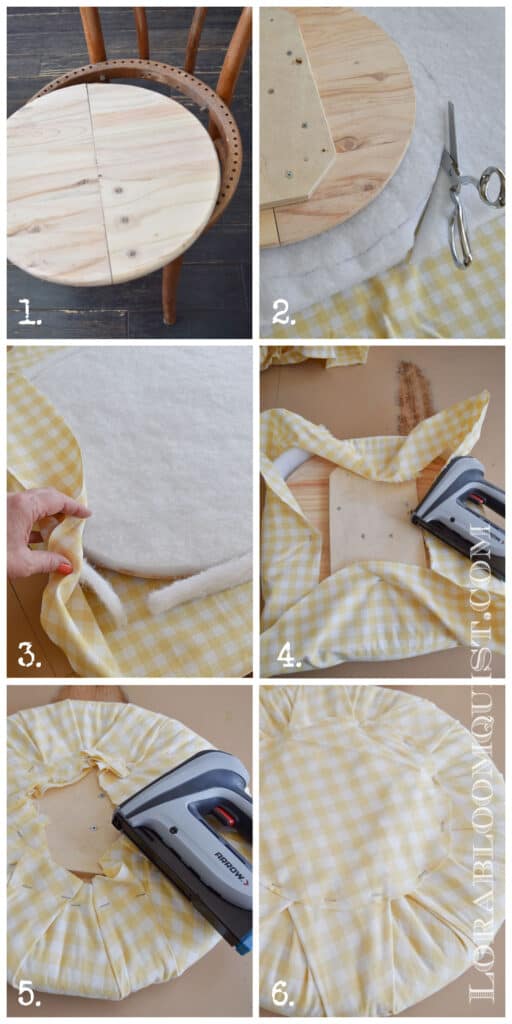
- Remove the old woven cane from the chair’s frame. Cut a new seat out of plywood. (We had to piece ours because we were using scraps) Soften the top edge of the wood seat so it won’t be sharp-either router or sand.
- Cut 1″ upholstery foam the size of chair seat ( I like THIS kind)
- Add additional thinner padding around edge so wood won’t be next to fabric. Cut fabric with enough extra to wrap around chair seat and have a couple inches.
- Using an electric staple gun, (get mine HERE) staple fabric to wood seat. I like to start on opposing sides to anchor fabric first and then finish tucking fabric in and stapling around.
- Here’s how the seat looks from the bottom.
- To finish off the bottom, cut a scrap piece to cover wood. It’s always nice for the chair to look good from the underside too;)
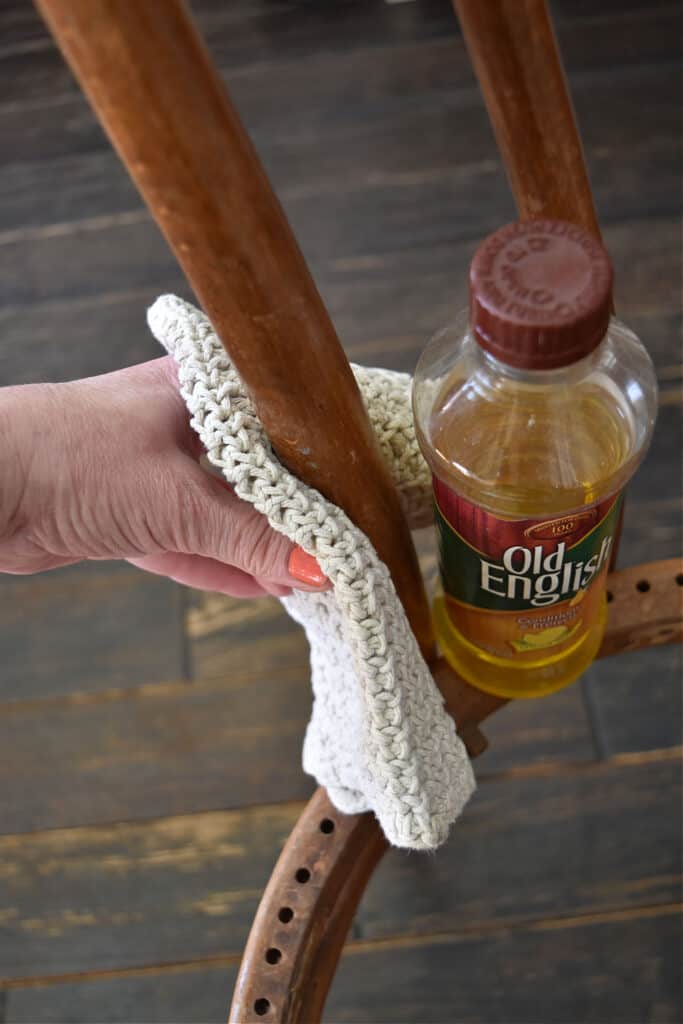
Refresh an old chair’s wood frame with lemon oil (get it Here). It will moisturize the wood, cover scratches and revitalize the patina.
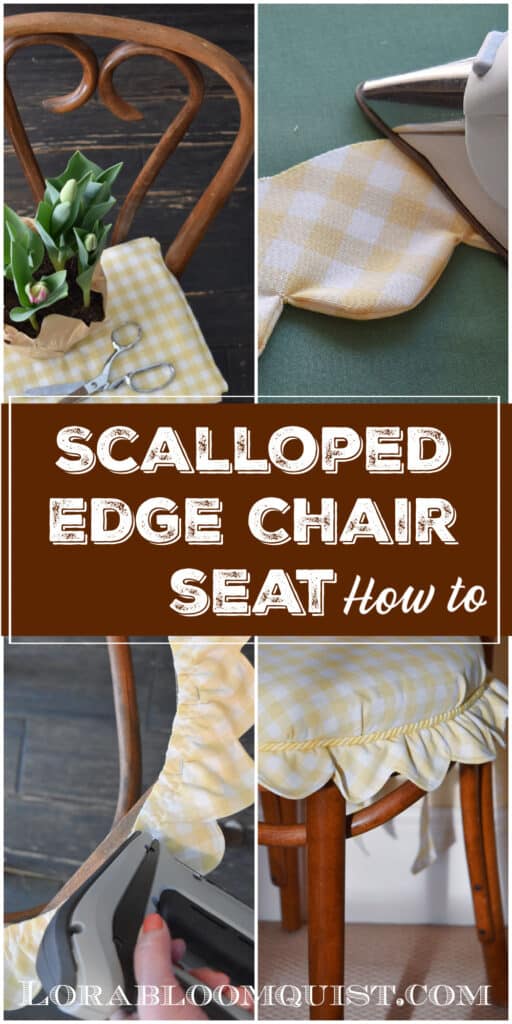
How to Make the Scallop Edge
You do need some simple sewing skills for this trim, but a basic sewing machine will do the job easily. (THIS machine would work well)
Measure around your chair to know how long to make your scallop edge. Add an extra 10+” to accommodate for gathering.
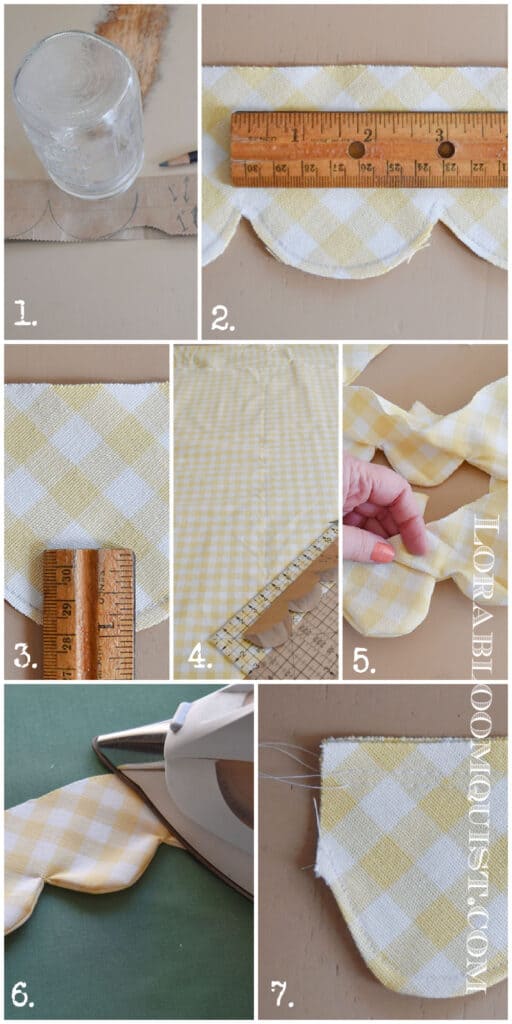
- Make your scallop template. You can use anything with a round edge. I used a pint size jar and a grocery bag. You really only need 3 scallops in a row; you can overlap when you’re repeating on your fabric.
- Best tip for making scallops: Don’t make them too deep. Look at the difference between #1 and #2. The first time I tried I made the scallops too deep which creates puckers when you turn the fabric inside out. #2 pic is a 3″ scallop that is 1″ deep. Much better!
- Here’s the 1″ depth.
- Once you have your template, you can cut your fabric( right side facing in). Cut your fabric on the bias. Take one corner of your fabric and bring it to the salvage edge, making a double thickness triangle. On the folded edge cut a 3″ strip (that is really 6″ thick). As you can see in #2 pic, draw your scallop pattern in pencil on the folded edge, leaving 1/4″ at the bottom.
- Trim excess fabric under scallop and turn right sides out.
- Iron flat, pulling seams out as you go.
- Topstitch scallop edge close to edge. Sew 2 basting stitches across top near each other.
Attach Scallop Edge and Chair Seat
Because there’s a space between the chair seat and the scallop edge, I added upholstery trim. It helps cover the staples and gives a more finished look. You could also glue any type of trim to this space also.
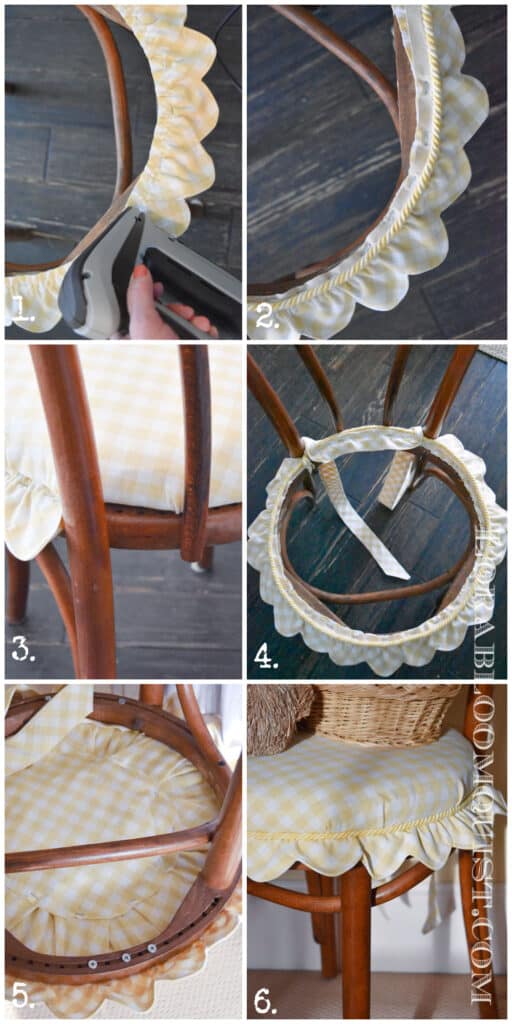
- First, pull the basting stitches to gather the scallop trim slightly and size it to the chair diameter. Using an electric staple gun, staple scallop edge trim around chair. I went from leg to leg, leaving the back section bare.
- Next, staple on upholstery trim that has a flange. Set the seat cushion on if you need a placement guide.
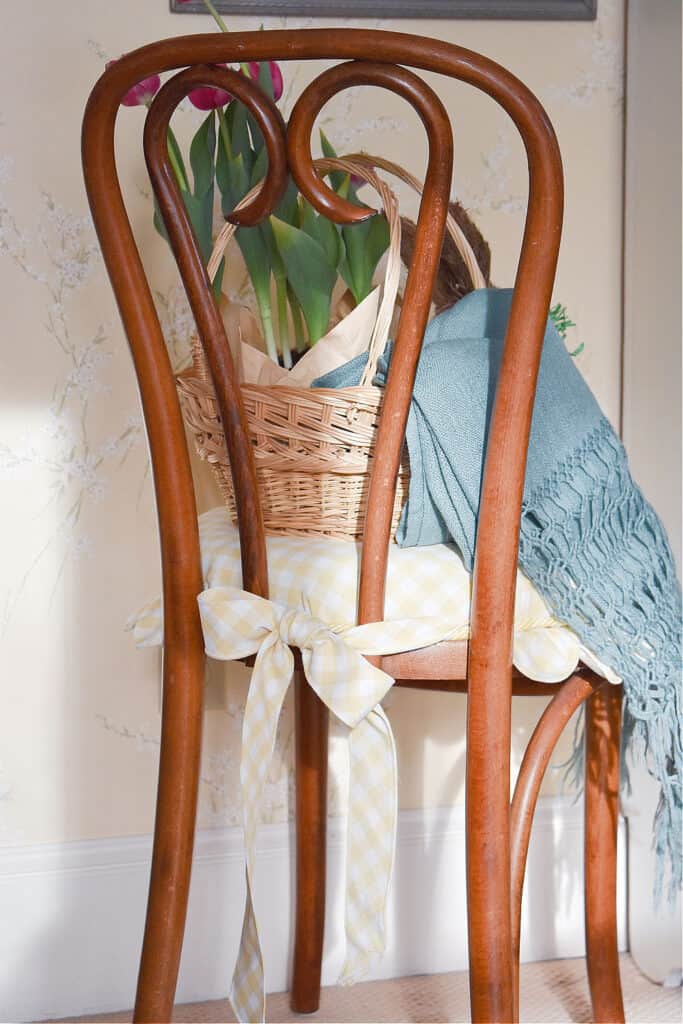
- To cover the back of the chair and make it look cute too, I sewed a long ribbon of fabric, turned it inside out and top stitched it.
- I stapled the fabric ribbon to the back of the chair between the legs so I could tie a bow in back.
- Attach seat cushion with screws. We were able to use the holes from the caning which made it easy.
- The finished scallop edging and upholstery cording with seat cushion on.
Simple Spring Chair Vignette
Once the chair makeover is complete, you can create a simple Spring vignette! I was first going to place this chair in our entryway like in the inspo. pic, but then I realized it would quickly get trashed there! Between a muddy dog, men boiling maple syrup, and just living in the country, Spring is dirty! A yellow and white check chair seat would not survive:(
Instead I placed it in our bedroom, next to a primitive white cupboard and our door with the green glass knob. Pretty similar to the inspo pic? Then to add the simple list of accessories.
A handled basket, tulips and a lacey throw:

And a cute bunny:
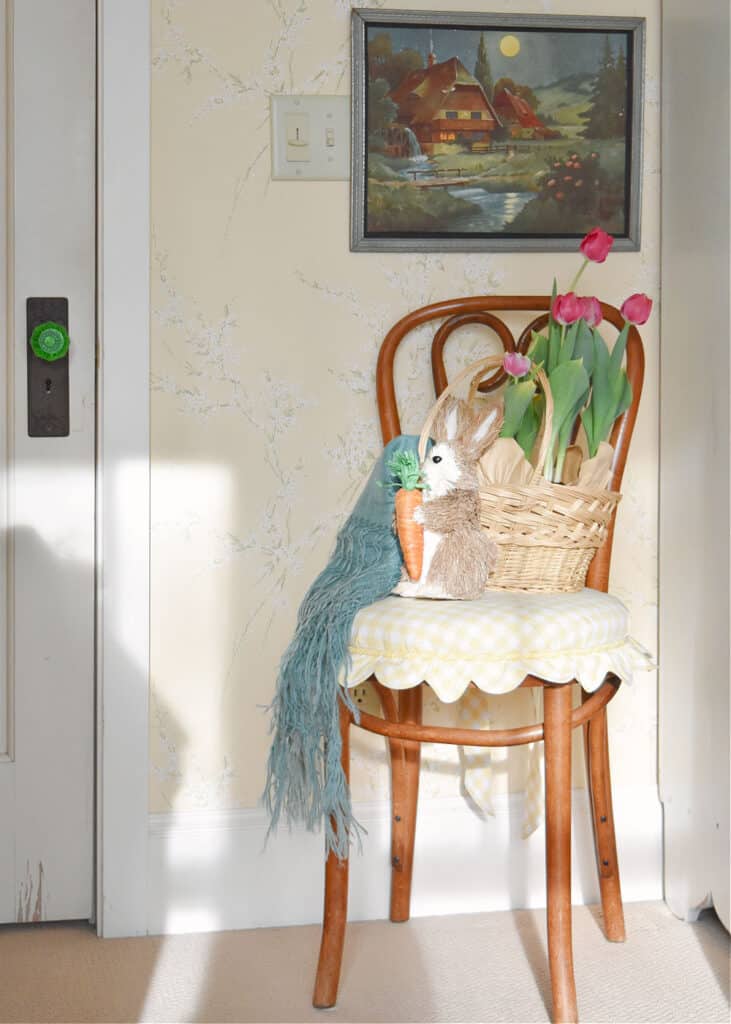
Perfect corner to enjoy a simple Spring vignette! (Did you notice I even got a light switch in? And some sunbeams?)
And look how cute the back of the chair looks with it’s pretty bow:
Cottage charm indeed! Doesn’t gingham check just get you in the mood for a picnic? This old bentwood chair had never looked so good!
I hope this tutorial inspired you to give an old chair new life, whether you need to revive it’s seat or not. Maybe yours is ready to be popped into a corner with a cute bunny and flowers already!
Enjoy more of our Pinterest Challenge series:
“A Patriotic Porch Pinterest Challenge”
“Decorating the Summer Porch with Refreshed Vintage Finds”
“DIY Repurposed Wooden Spindle Carrots”
I can’t wait to see what the rest of my friends came up with for this Pinterest Challenge! Visit the super creative Decor to Adore next; Laura’s decorating with a Springtime dreams theme.
Thanks for reading DIY Chair Seat with Scallop Edge. If you enjoyed the inspiration, be sure to sign up to become an Insider to keep the ideas flowing! (sign up HERE).
Follow Me: LTK | Amazon | Pinterest | Instagram | Facebook
pin and share!

Sharing at these lovely parties:
Love your chair, I have several in the garage, I think this may be the perfect treatment for them! Here from Turn About Tuesday. Very CUTE!!!
Thanks, Sandra; I was pretty happy with how cottage-y it turned out:)
This is super cute! Your chair cover is the perfect touch!
Niky
Great tutorial on replacing the chair seat, Lora. The yellow gingham is perfect. I used to have some of those bentwood chairs. They are so classic. Very cute arrangement, too.
Lora, Your chair is so adorable! I love the yellow and white fabric you chose. And you had me at the bow on the back. It was the perfect solution to a chair with no seat.
( My apologies for the late reply, I have been traveling this week)
Lora, what a cute chair recover!! I do enjoy seeing what kind of projects you come up with and your stool turned out fabulous. It is the perfect place to share your bunny and her basket and tulips!!!
Happy spring and Easter to you and your family,
Big hugs,
Barb 🙂
Well those scallops are waaaay cuter (and harder) than my quilted tag! I love this and would drool a little each time I saw it. It’s seriously precious and you blew us all out of the water with this vignette! When I think you can’t get anymore talented, you do. Dang girl. Love this. pinned x4!
Love this DIY for a new seat cushion! It’s so pretty and fresh, Lora! What a great DIY for this challenge, too! Love all the elements you placed on top of the chair, too! Pinned!
hi lora, oh my this is so great! You win for most effort! love this one. Pinning for reference…. I am wanting to work on my upholstery skills, laura in colorado
That chair is precious and your cushion is gorgeous. I love the scalloped edge. Such a fun place to create your pretty vignette.
Your chair looks so sweet Lora, and the added detail of the bow takes it over the top! The perfect chair for a spring vignette! Love it!
Thanks, Michelle! I love it’s cottage charm:)
Very cute!
Thanks, Fonda!
Lora, Your vignette is so pretty. It’s perfect for Spring! That chair is the cutest. I love the scallops.
Scallops just make anything cute:) Thanks, Renae!
What a perfectly wonderful chair. You made an old chair look so cute and pretty, great job!
Thanks, Marlene!
Cottage charm in spades! I love this Lora, the yellow gingham is perfection 🥰 Thanks for the detailed tutorial…some day!
I’ve always loved this fabric and have been craving yellow for Spring!
Oh my gosh, Lora!!! This is ADORABLE!!! What pretty fabric and that scalloped edge is just adorable. Anything with scallops 🙂 You did an amazing job styling it with the pretty flowers and bunny. Beautiful Spring decor!!
Thanks, Rachel! Fun to have a cute little Spring corner in our room:)
I absolutely adore the scalloped detail. I have some old ice cream chairs that would be darling transformed in this way. Bravo!
Yes, scallops would be perfect on them, and you’ll have an easier time sewing them than I did!
I love your scalloped edge chair; it’s so cute. It reminds me of a scalloped edge dress I made for myself back when I was in high school (50 years ago!!). I have an old bentwood chair or two down in the basement and you’ve inspired me to update one for the spring.
Always happy to inspire memories, Lauren:) Good luck with the chairs!
Lora,
That seat cushion is so cute. Fun challenge.
Thanks, Rachel!