
Upcycled Old Tin Organizer DIY
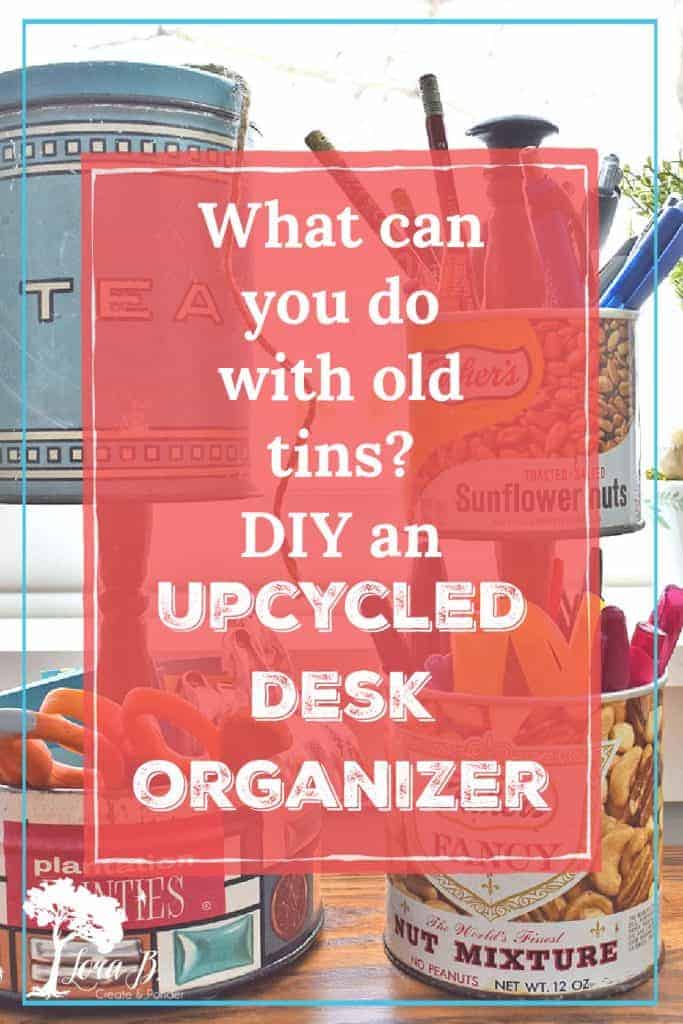
What can you do with old tins? Upcycle them into a handy organizer, perfect for your kitchen desk!
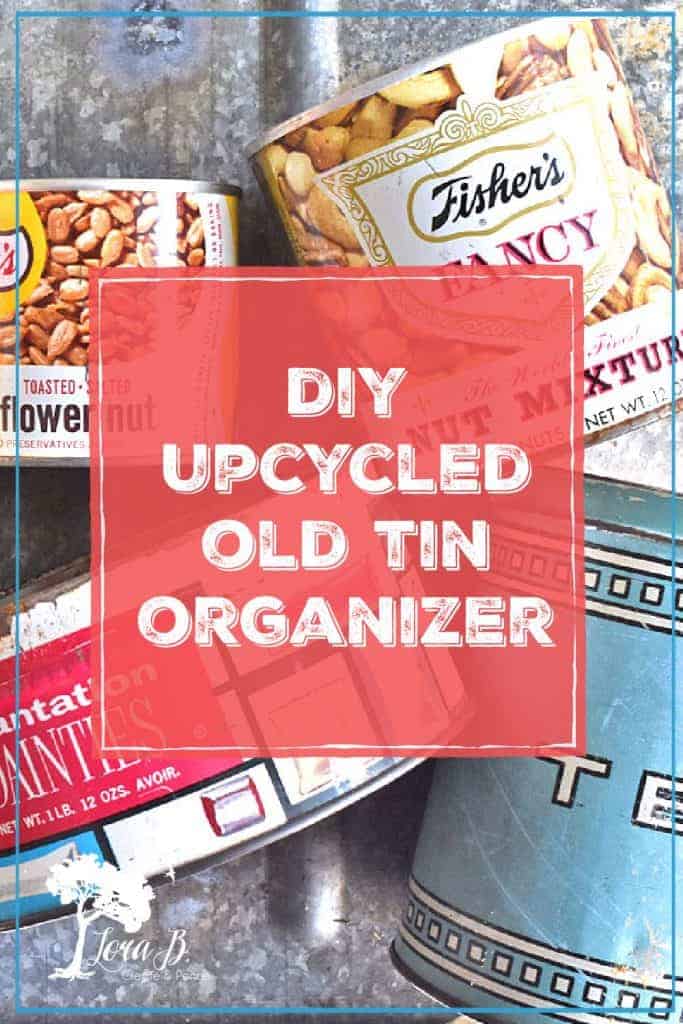
Reusing old kitchen tins that food used to be packaged and sold in is nothing new. In fact, the main place I find these vintage tins is usually the garage or basement workshop of old handymen. The tins I used for this upcycled project were full of screws and nails in my dad’s shed. So, yes, they do have sentimental value; all the more reason to enjoy them in a new way! Hopefully this Upcycled Old Tin Organizer DIY will inspire you to make one, too!
Today I’m joining a bunch of creative friends for our monthly Thrifty Style Team challenge. You’re going to love the seasonal, timely projects my friends came up with…all inexpensively, of course! Thanks to Julie at RedHead Can Decorate for organizing us! I’ll have links to all their projects down below!
Upcycled Old Tin Organizer DIY
For your convenience, this post contains affiliate links. If you make a purchase, I may receive a commission. There is no additional cost to you. My full privacy policy is here.
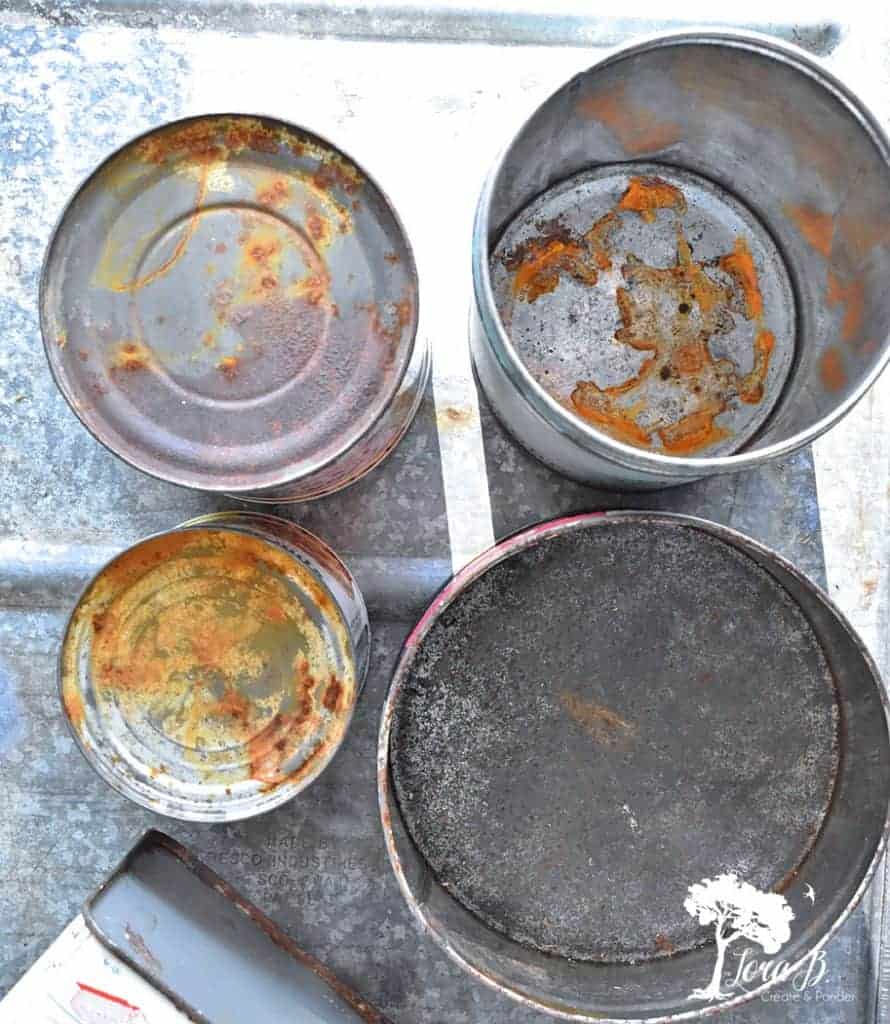
To Start, Seal and Clean Your Old Tins
Like I said, these great old tins are usually found in pretty dirty places. If they’re greasy, I like to use THIS cleaner to cut through the grease. If they’re rusty, I use THESE to scrub, being careful with any cute graphics or labels. Then I seal with THIS. It seals and brings out the colors; it also makes any rust look beautiful. You can use the brush on version, or the spray.
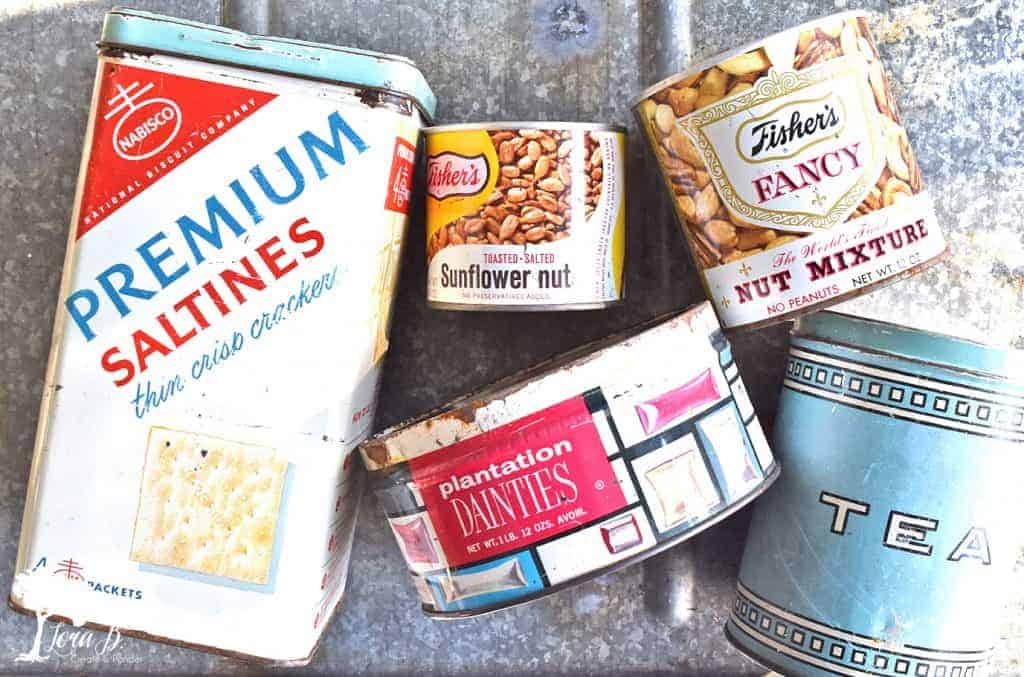
I’ve been organizing my kitchen desk to start out the new year (with everyone else, right?). I figured these old food tins would be perfect for some upcycled desk storage! (Actually, I didn’t use the saltines one, but I’ll figure out something for that one).
Gather Your Tools and Get Started Upcycling
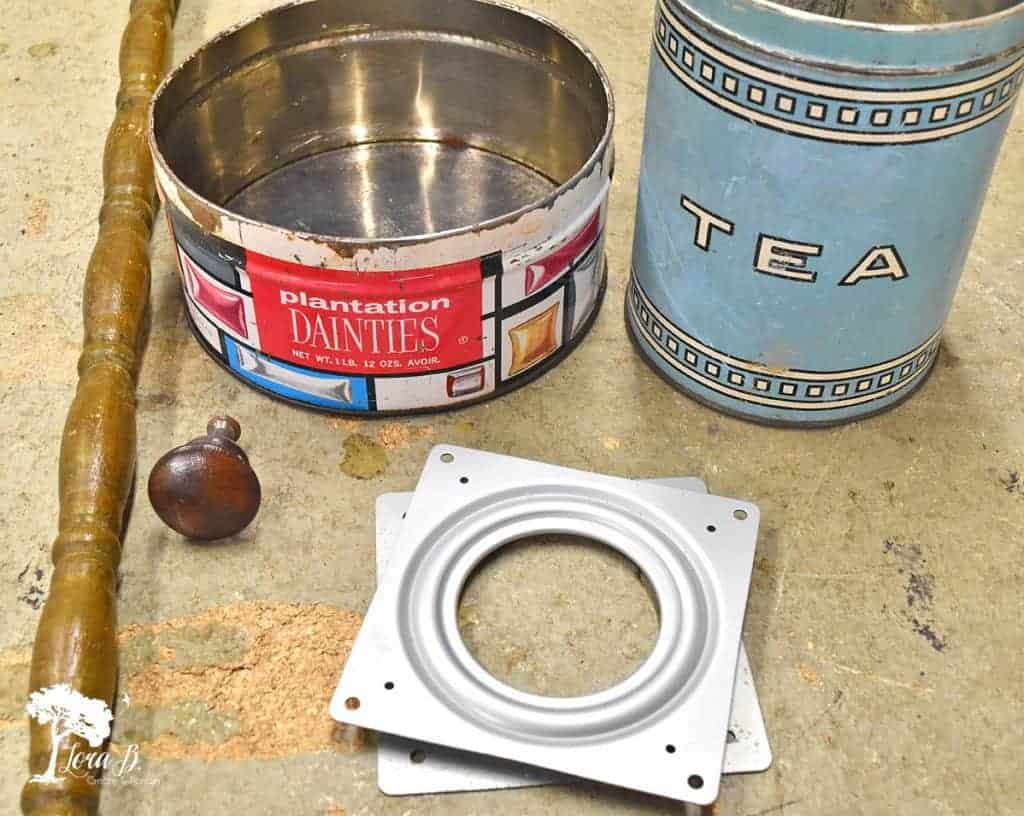
Here are the things you’ll need for this project:
old tin containers
spindle
wooden knob (optional)
Fender Washers, 1″ and 2″ sizes
screws-regular and double ended
Drill
Lazy Susan mechanism (optional)
Saw
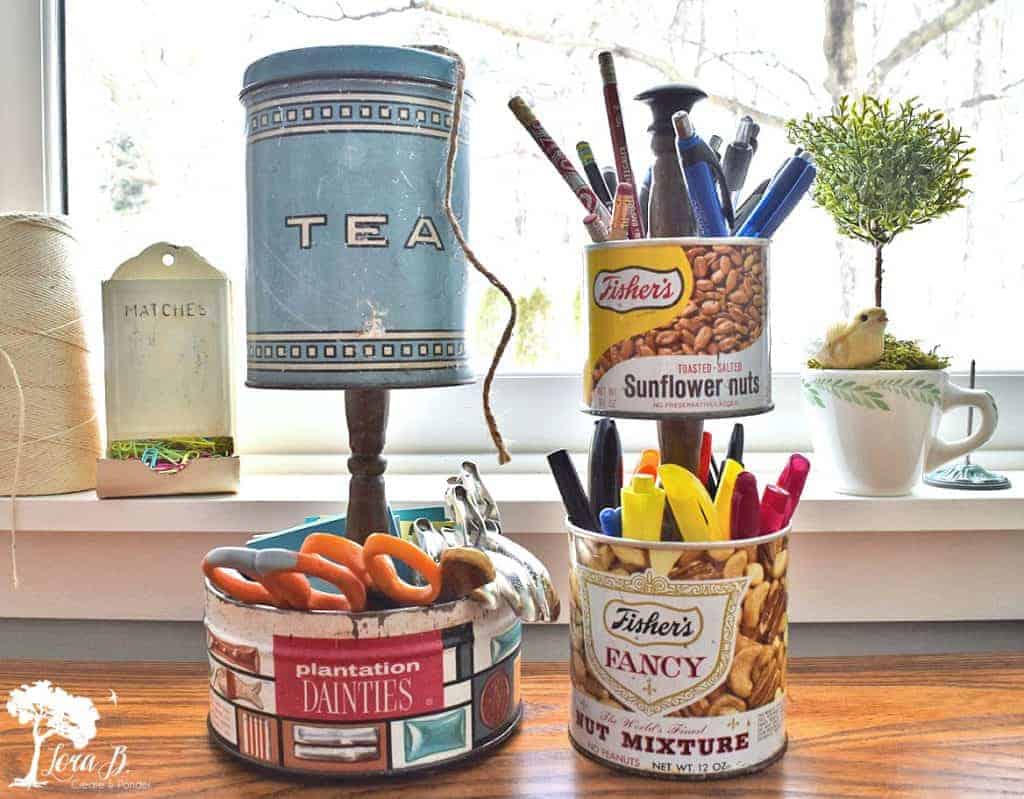
Decide which of your tins work well together. I grouped mine by color: the nut ones together and the tea and mints together because of their aqua colors. I also decided to keep the top of the tea container on, so I could put twine in it.
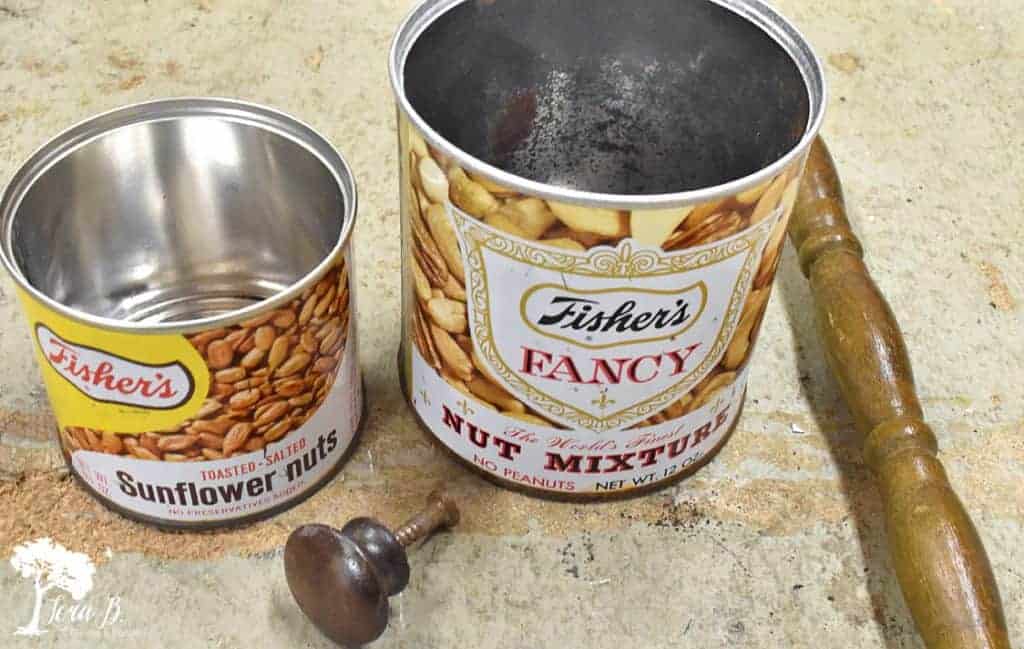
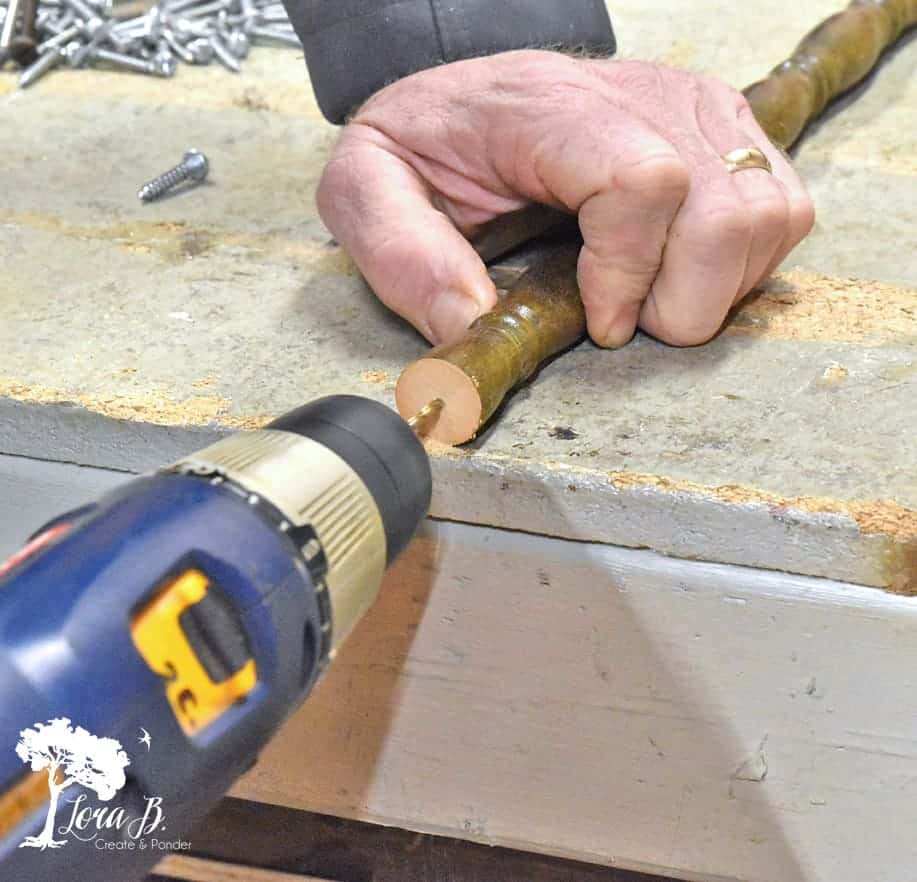
Cut your spindles to length, dependent on what spacing you want. I wanted 3-4″ between the two tins, so I could put pens, scissors, hole punches, etc in them.
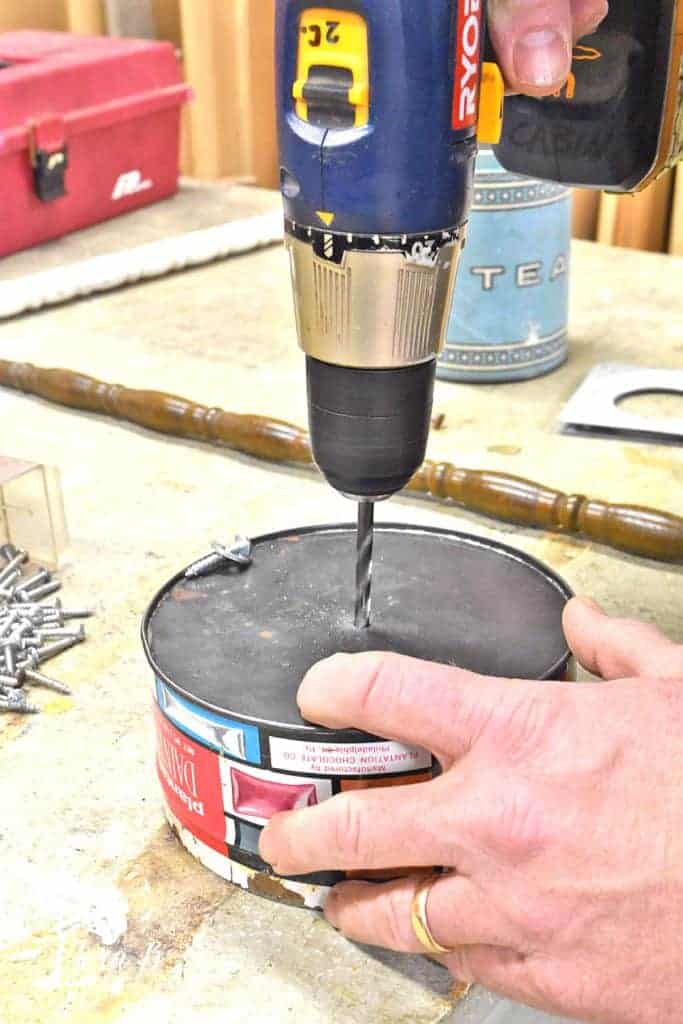
Drill Holes in Old Tin and Spindle Sections
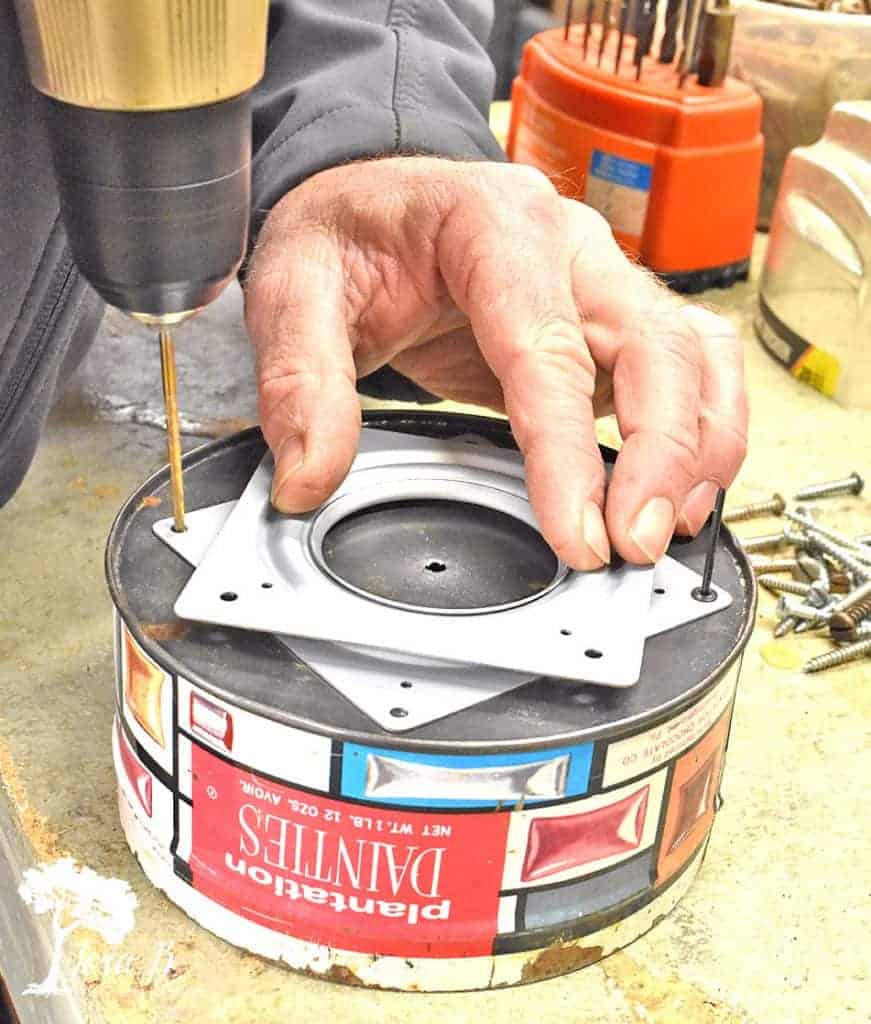
Place Lazy Susan on Old Tin, If Desired
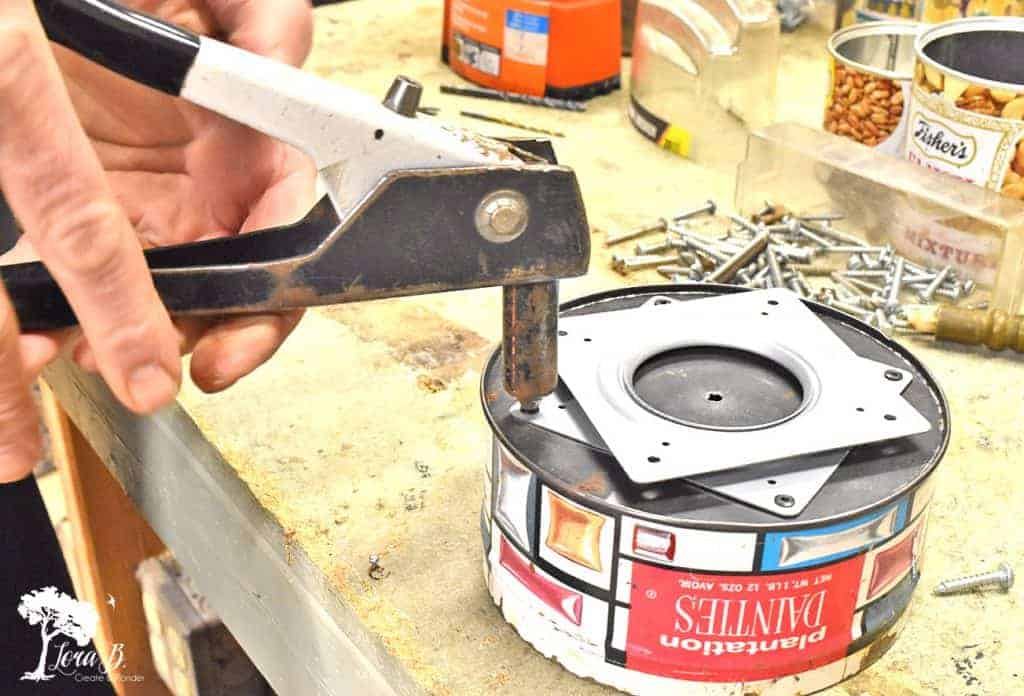
If your bottom tin is large enough, you can place a lazy susan device on the bottom, so your upcycled organizer will spin. It’s just a fun extra to make it more handy. We made one organizer with the lazy susan device and one without.
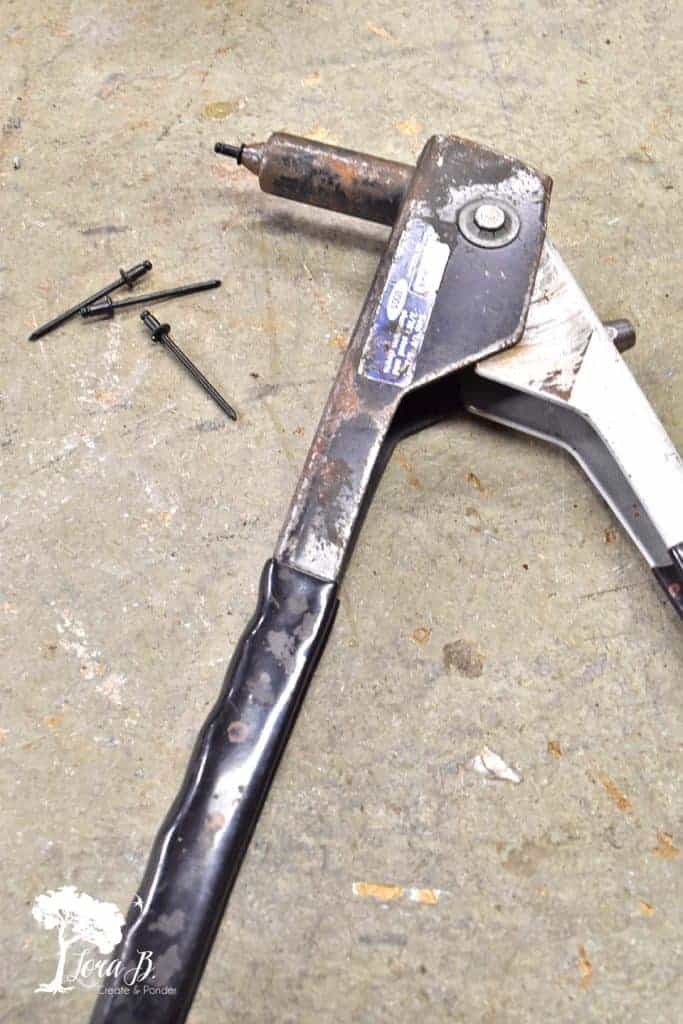
We attached the lazy susan device with a pop rivet gun. It could also have been glued on with THIS, but Mr. Fix-it prefers mechanical attachments;)
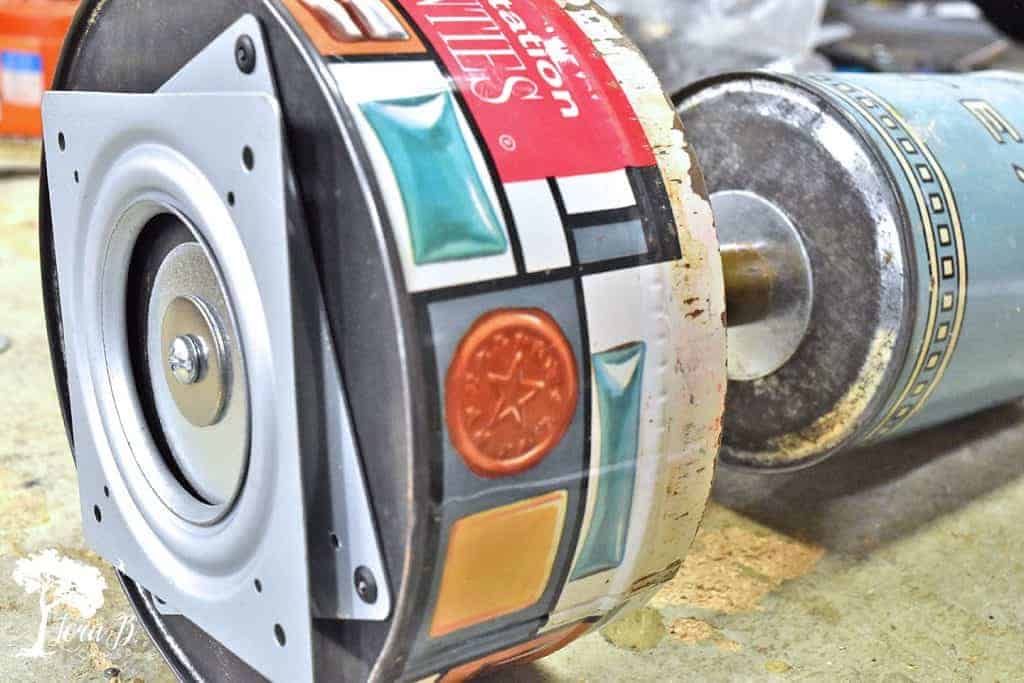
Use Washers to Assemble the Old Tin Organizer
Because the spindles are thinner, washers help to make the whole organizer more stable. Use a combination of 1″ and 2″ fender washers along with a screw for a tight, stable fit.
On the inside of the Tea tin and on the inside of the lazy susan device at the bottom, you can see how to layer a larger washer with a smaller one, and then tighten with a screw. Between the spindle and the tin we used a single washer.

Enjoy Your Upcycled Organizer on your Kitchen Desk
Ready for the big reveal? They’re perfect for my newly cleaned and organized kitchen desk! I love using repurposed vintage items to organize and display.
We used this same idea when we repurposed some vintage metal serving trays in “How to Upcycle Vintage Metal Trays into a Tiered Stand”. That project was fun to use for desk organization, too! And my “Repurposed Vintage Sewing Machine Drawer Organizer” was a popular organizing upcycle, too!
Hope this Upcycled Old Tin Organizer DIY gave you some ideas for those vintage tin containers you may have lurking in your garage or basement! Can’t wait to see what the rest of the Thrifty Style Team came up with this month!
Please Pin, Share, and Enjoy the Rest of the Inspiration!

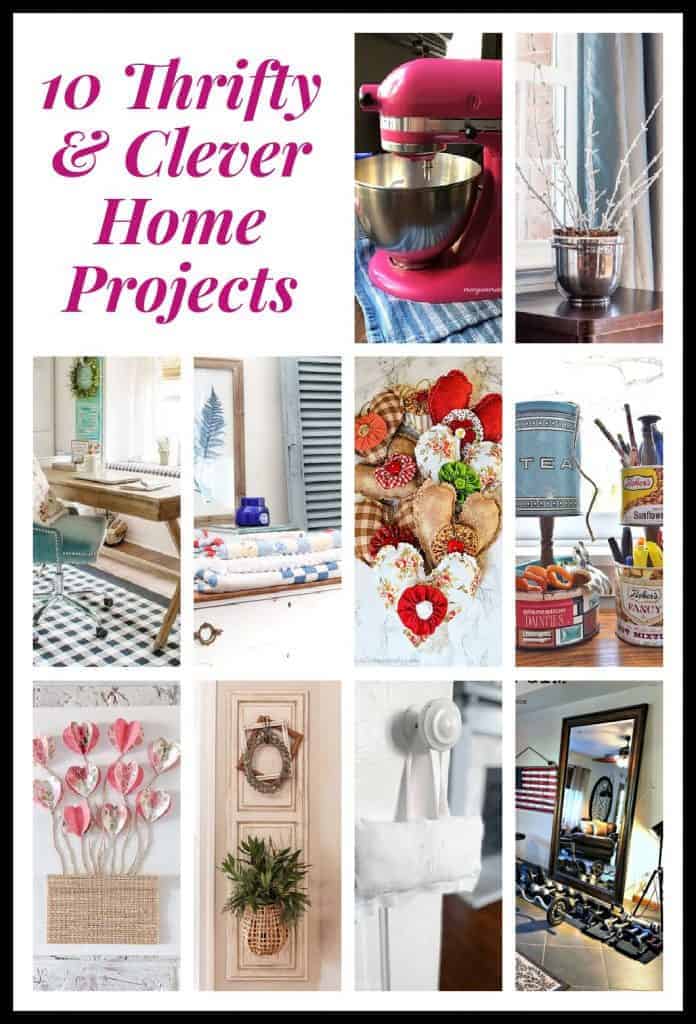
What Meeghan Makes “How to Refresh a Stand Mixer with Spray Paint”
Sweet Pea “DIY Frosted Branches”
DIY Beautify “7 Thrifty Cleaning and Organizing Solutions for the Home”
The Tattered Pew “Bergere Painted Shutters”
Cottage at the Crossroads “Fabric Hearts with Yo-yos”
Postcards from the Ridge “Paper Heart Wall Art”
The Painted Hinge “How to Make Wall Decor out of Cabinet Doors”
2 Bees in a Pod “Repurposed Vintage Tea Towel”
Red Head Can Decorate “DIY Home Gym”
The How To Home “DIY Family Charging Station”
Sharing at these lovely parties:
Love that this is upcycled and it rotates, Lora! Kind of like a dress that has pockets! LOL!
Don’t forget to join us over at the Creatively Crafty Linky Party every Wednesday through Sunday
Pinned!
Creatively, Beth
Thanks, Beth!
Adorable and practical. Great
Definitely both! Thanks:)
This is just the cutest idea Lora. But then again, you always have the best ideas on your blog. Thank you for sharing at Charming Homes and Gardens.
Thanks for your sweet compliment, Kim!
This is soooo awesome!
Thank you, Amber!
This is such a fun idea! I love how it turned out!!! I’m so inspired Lora! thanks for sharing at Charming Homes & Gardens!
Thanks, Kristin!
What a fun desk organizer! Thanks for sharing at Vintage Charm!
Your welcome, Cecilia! Glad you liked it:)
I am swooning over both of these vintage tin organizers! The added spinner makes them perfect!
Have a wonderful weekend,
Kippi
Thanks, Kippi! I’m enjoying them, too:)
Goodness gracious, I felt like I was scrolling forever to make a comment! You are loved girlfriend! Could be that or this adorable DIY which we are featuring at the Farmhouse Friday link party but I bet it’s you that is adored. Thanks for sharing it! 🙂
Thanks, Cindy! They just love me for my junk;)
Lora, thanks for sharing this post. I like the idea of creating nice looking storage. I especially like the blue tin with the twine. What did you use to create a hole in the tin’s lid for the twine to thread through?
Glad you enjoyed it, Missy! We just used a drill to make the hole:)
Very impressive Lora. Having them swivel is absolutely genius! i love vintage can and this is just so cool to repurpose them for organizing purposes. Thanks for sharing.
Yes, the lazy susan piece does make it handy!
I love these Lora… especially that they turn!! Pinned!
Tania
Yes, first time using that device, and it’s pretty slick!
Oh goodness this is the cutest organizer I ever did see! That blue tea tin speaks to my heart! SO pretty and so functional! Pinned!
You’re so sweet, Kelly; thanks!
I love these so much Lora! I’m going to have to make some for myself to store my supplies in my out of control craft room.
Yes, they’re awesome for craft organization, Michelle!
This is such a creative way to reuse your dad’s old tins! I love the colors and the patina. And isn’t everything better when it’s well engineered? 😉 They look great holding your desk supplies.
It’s always well engineered over here, Angie;) Maybe sometimes a little too much for my “it’s okay” personality! I’m just enjoying seeing the top of my desk!
What a great repurposing idea! I will never look at a vintage tin the same again!
Wonderful! I love sharing “potential” with people:)
I’d like to think of something to use my Ritz cracker tin for. I haven’t found a Saltine tin yet–that I choose to afford! LOL! My prob with covered tins is that I forget what is in them (out of sight, out of mind) and stuff will go stale! Like I said in another blog post, I love my Hershey plastic “tin” containers for hot glue sticks. I just love the ingenuity of these organizers! My Christmas stuff is staying up probably for another week as I got it up late and am still enjoying it. My new, next year’s tree from Wayfair is riding around in the car waiting to go to the storage unit!
I’m still trying to think up something for that saltines tin; you’ll hear about it when I do, Kathy!
I’ve seen this style of DIY organizers on Pinterest but what makes yours stand out above the others is the awesome “vintage” tins! Very clever, creative, and functional organization idea for that awesome workspace you created in your bedroom.
Yes, I’ve seen ones like it on Pinterest too, Marie, so it’s definitely not original (which I like to be, ya know;). I just wanted to do something with them where I’d actually get to use them and enjoy them. And I certainly am!
This is such a great repurpose Lora! I love the vibrant colors of your vintage tins!
Thanks, Cindy! Yes, the punchy graphics are so fun to look at:)
What a great idea for using old tins with great graphics. Now your desk is more organized and you have a unique item on your desk that is sure to be a conversation starter whenever anyone visits your home.
PS – I have a saltine cracker tin like yours that my mother-in-law gave me. Seeing your reminds me that I need to get it out of my basement and into my pantry to use for crackers storage.
I’m hoping it will help me keep the top of my desk clean, Paula! But that might be a lost cause:(
Great idea for old tins we just can’t part with. Sadly I sold most of my tins at 2 rummages in Oct., but kept a peanut one, like yours, because it also was my Dad’s, who is now 96. Thanks for showing the step by step process.
Glad you still have the peanut one, Luane! My dad always ate peanuts, too; that’s why I’m sentimental about this one:)
Great idea, but of course that is just you, creating something useful and cute. Thank you.
Yes, I love the combo of functional and cute, Marlene!
So Cute and Creative.
Thank you, Rebecca!
Thanks for sharing! Love all the DIY ideas that were sent from others. Have a great day!🤗
Your welcome! Glad you enjoyed them:)
Lora – your tin can organizers are so creative! Such a perfect upcycling project. Thanks for sharing such a great idea!
Hoping they help me stay organized! Thanks:)