
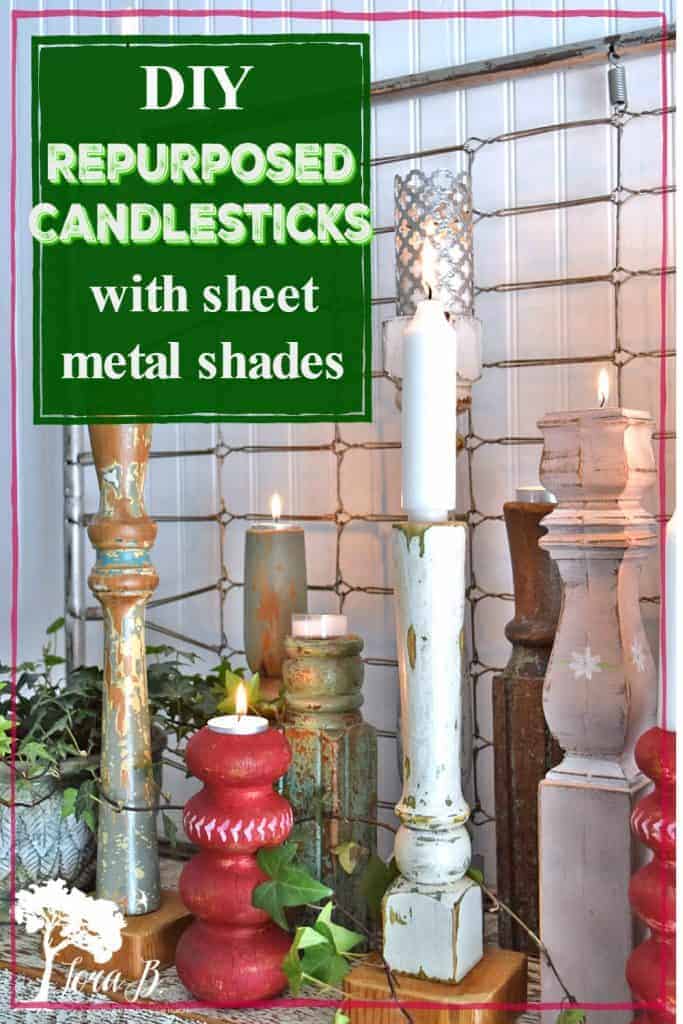
DIY Repurposed Candlesticks with Sheet Metal Shades
Repurpose old table legs into DIY candlholders. Finish them off with upcycled sheet metal shades.
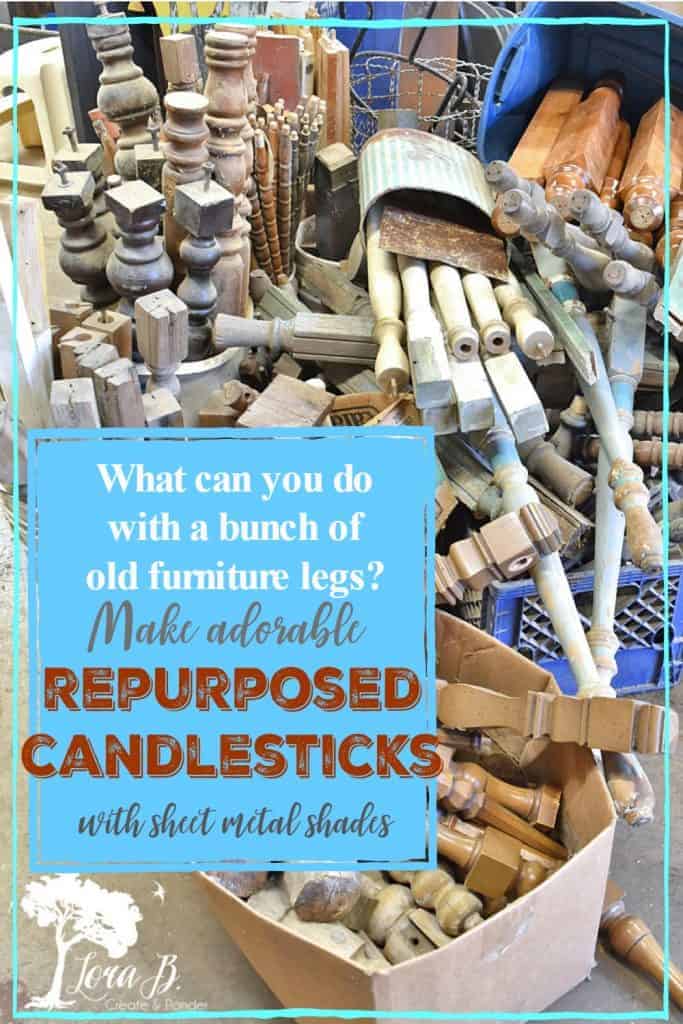
There’s nothing better than taking something that was cluttering up the garage and transforming it into something beautiful! If you’ve got some old furniture laying around, you may start eyeing the legs after today’s repurposed, upcycled project. Your garage will be a little less cluttered, and you’ll have some adorable, unique candleholders to decorate with! Hope these DIY Repurposed Candlesticks with Sheet Metal Shades will fill your mantel next!
Today I’m joining a brand new group of do-it-yourself bloggers that love to create with thrifty finds. Thanks to Julie at Redhead Can Decorate for inviting me to be on the team and for organizing this bunch! This month 14 ladies are creating with a Christmas theme; I’ll have all their posts at the end.
If it’s your first time here, I should let you know I’m a vintage junker to the core. Each spring I go curbside junking for several days and find most of the “potential” for my projects {“Curbside Vintage Junking, Best Ever”}. I’ve been doing this for…a long time;) I was a dealer for many years at different vintage shops and owned my own for 6 years. It was a blast. But now I’m happy to keep hunting down vintage treasures I can repurpose and not have to sell all the good stuff! It’s fun to finally be able to decorate my own home with my creations and inspire all of you, too!
On to my 1st Thrifty Style Team project!
DIY Repurposed Candlesticks with Sheet Metal Shades
For your convenience, this post contains affiliate links. If you make a purchase, I may receive a commission. There is no additional cost to you. My full privacy policy is here.
This project started with the boys I share the garage and shop with requesting me to “go through the spindles”. Really? Does the picture above look like I need to edit my hoard stock of furniture legs? They come in handy for so many things! But Mr. Fix-it was excited to have his garage a little cleaner, so I dug through all the “potential” and gave them some fire starter material.
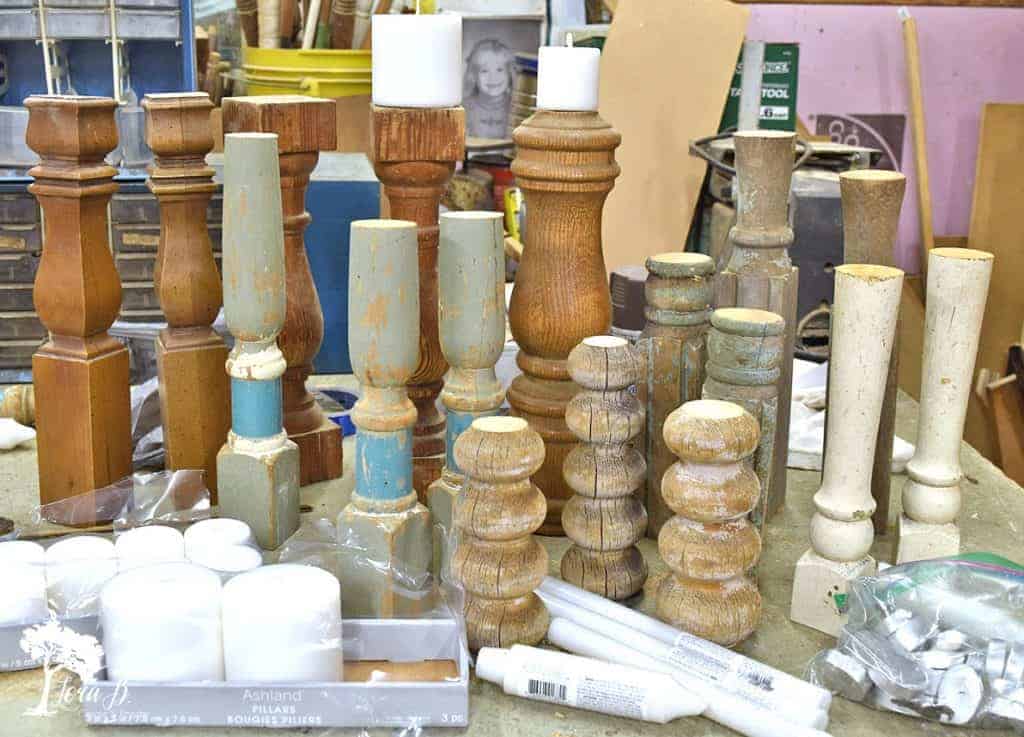
Then I picked the furniture legs I was most excited to repurpose into candle holders.
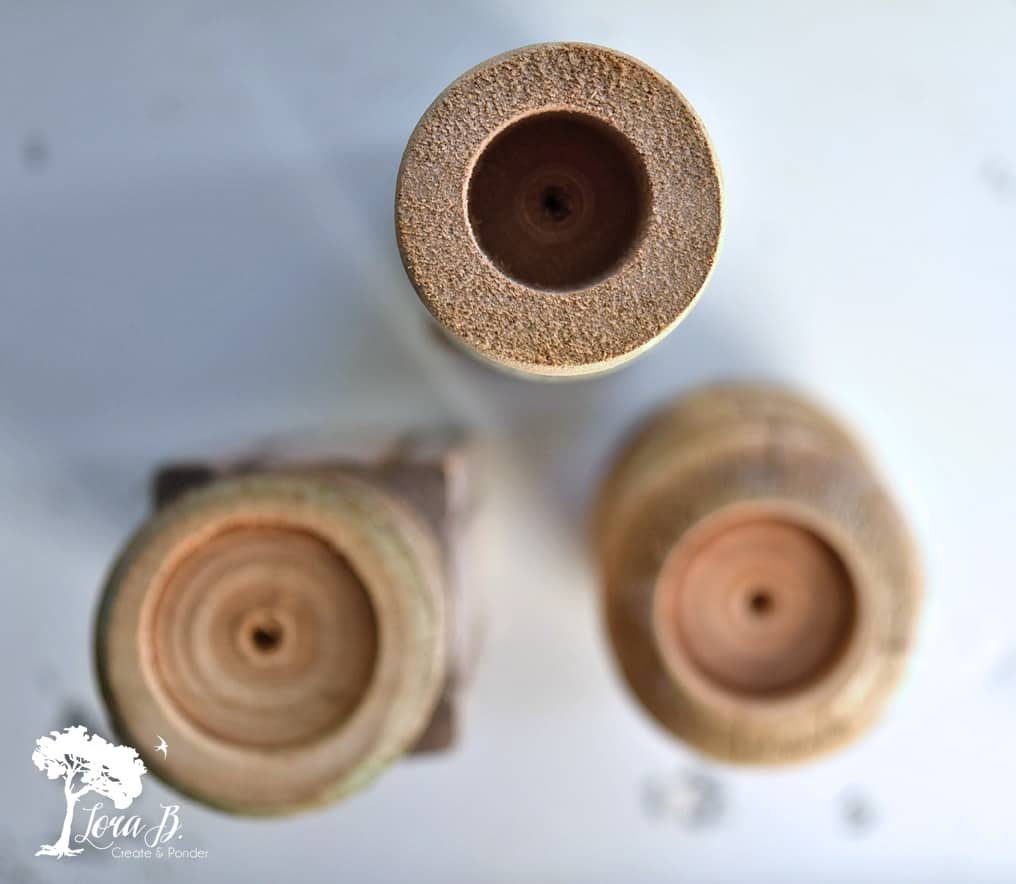
First, Cut the Furniture Legs Into Candlestick Lengths
Cut your furniture legs into candlestick lengths. We cut most of our table legs in half. We also gave the rough ends a clean cut. It’s more interesting to upcycle these in a different way than they were normally used. So most of the table legs should be turned upside down; it’s just more fun.
Sand rough edges when done.
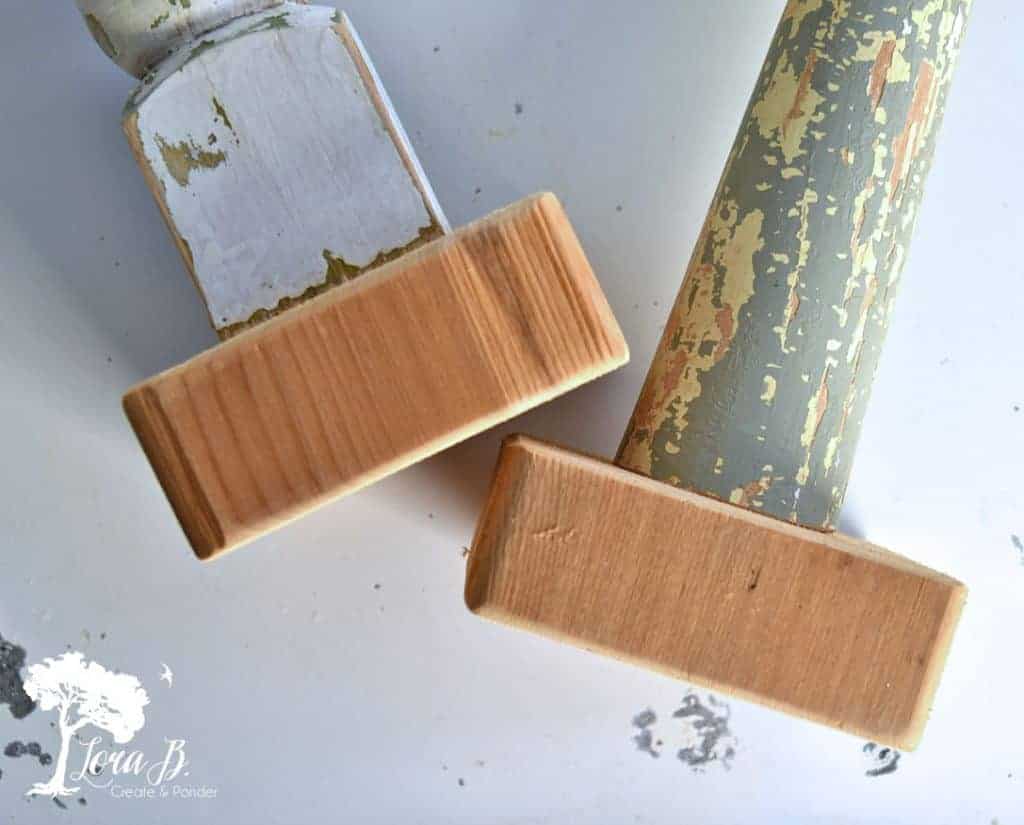
Put Bases on Wobbly Legs
Some of the pieces may need a larger base to stabilize. We screwed a simple square of cedar onto the bases of some of the more lightweight and skinny legs. If you’re going to have a burning candle in these, you don’t want them tipping over.
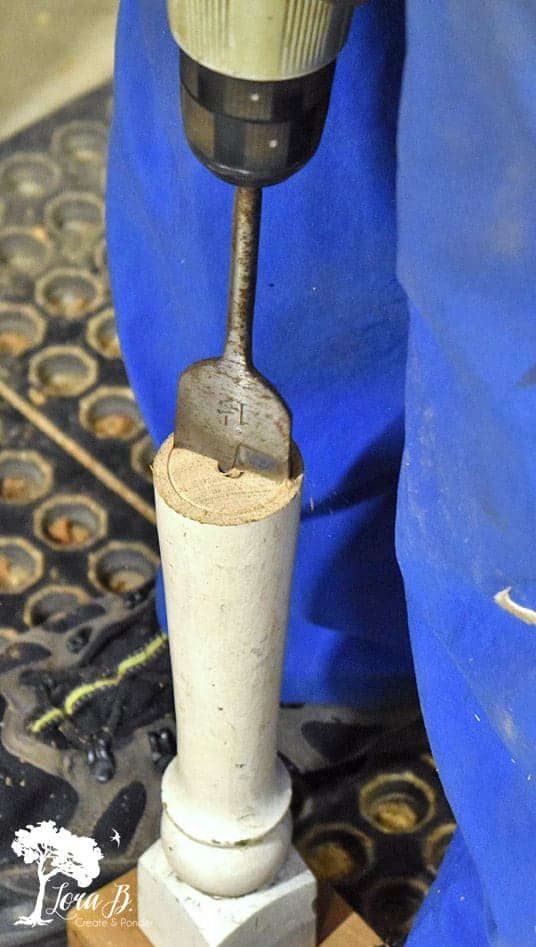
Next, Drill Holes for Different Sized Candles
I bought a group of various white candles for this project. I decided which candles I wanted in which leg and drilled holes accordingly. Pillar candles would sit on the larger diameter legs, tapers would marry up with some legs, and votives would tuck in the rest.
Make Sheet Metal Shades
Another “extra” item in the garage was a stack of sheet metal pieces, left over from placing it in frames {” Sheet Metal Frame “}. To add a little sparkle and some interesting lighting effects to my candlestick grouping, I wanted to create simple shades to go around some of the candles.
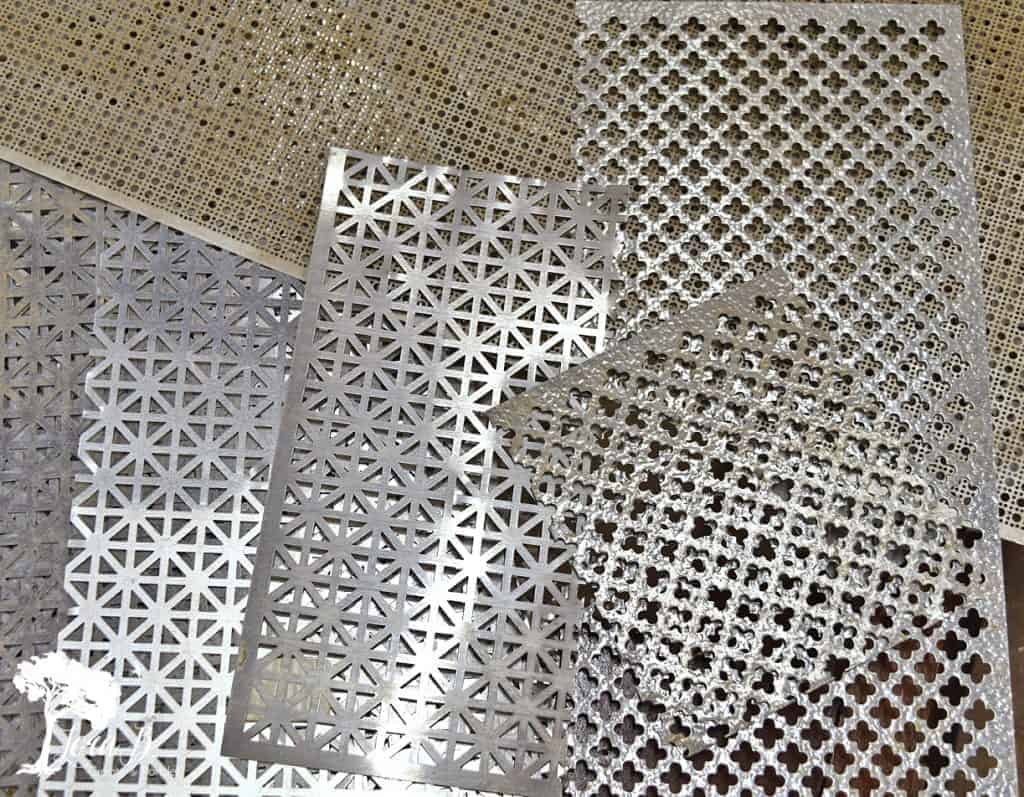
Cut the sheet metal height about an inch above the top of the candle. Then use a cylinder to wrap a length around. A spray paint can worked well. Use a tin snips to cut the length you need with a slight overlap, matching up the pattern.
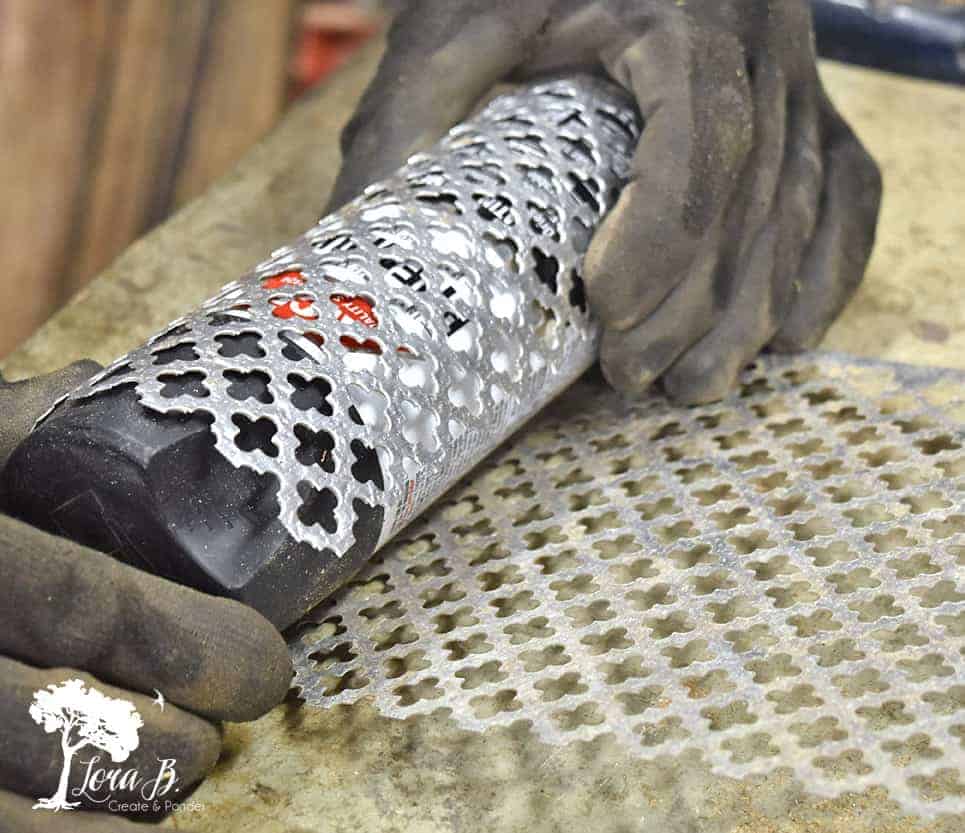
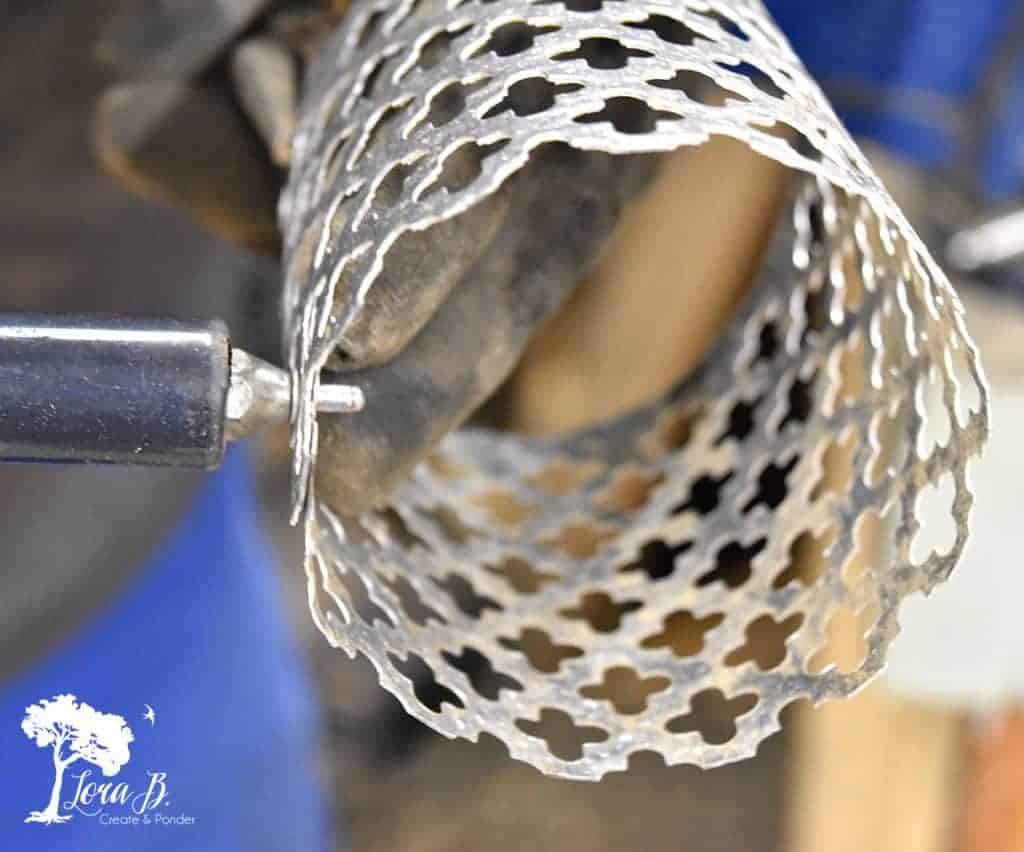
Hold the shade in place with vice grips at both ends. Drill small holes and close with pop rivets. (This was my first time using a pop rivet gun, and it was kind of fun;)
Finish the DIY Candlesticks with Paint and Poly
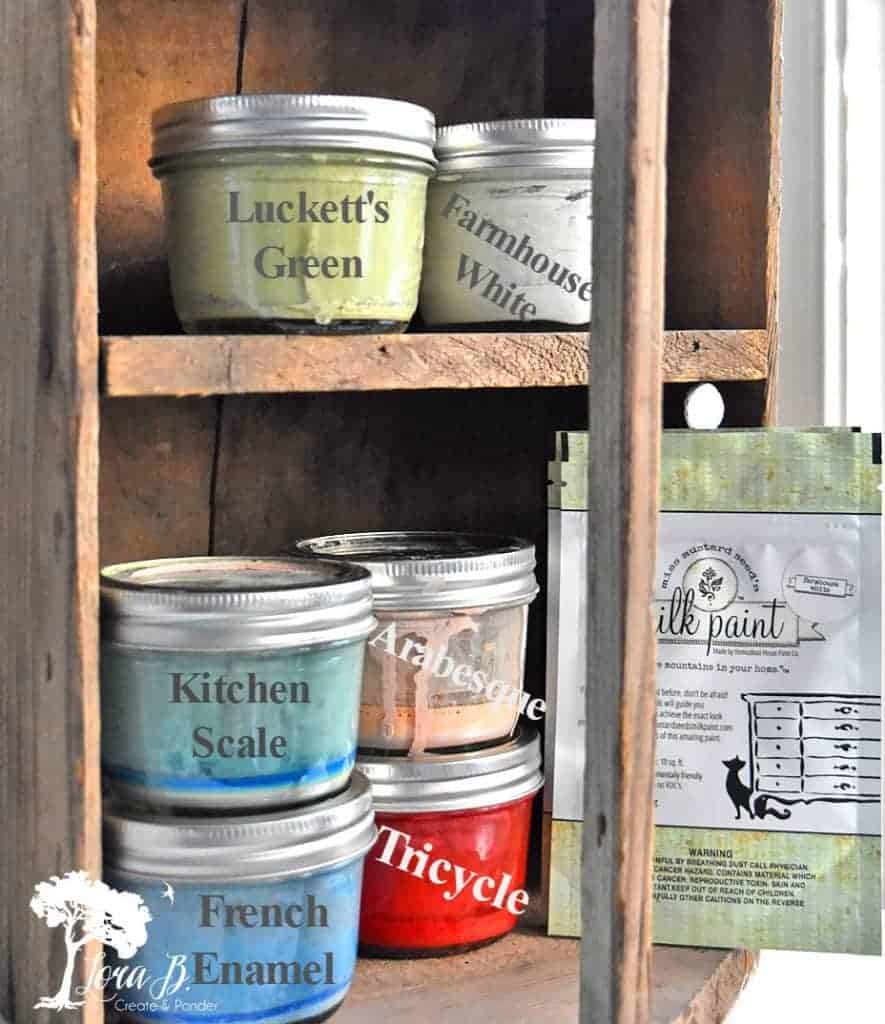
Time to really turn these old legs into something beautiful! Vintage Shiny Brite ornaments were my inspiration for painting these candlesticks, because I’ll be displaying them on the mantel for Christmas. I pulled out my stock of my favorite Miss Mustard Seed’s Milk Paint (get it HERE) and chose these colors:
Miss Mustard Seed Milk Paint provided me with some complimentary paints for this project. All opinions about their products are my own.
Find Miss Mustard Seed’s Milk Paints HERE. (Use code 10OFFLB for discount)
MMS paint is a powdered paint that you add water to mix. It’s totally different than any other paint I’ve ever used. I love that it’s thin and allows the vintage beauty and character of a piece to shine through. It’s a chalky finish and needs to be lightly sanded and sealed to finish.
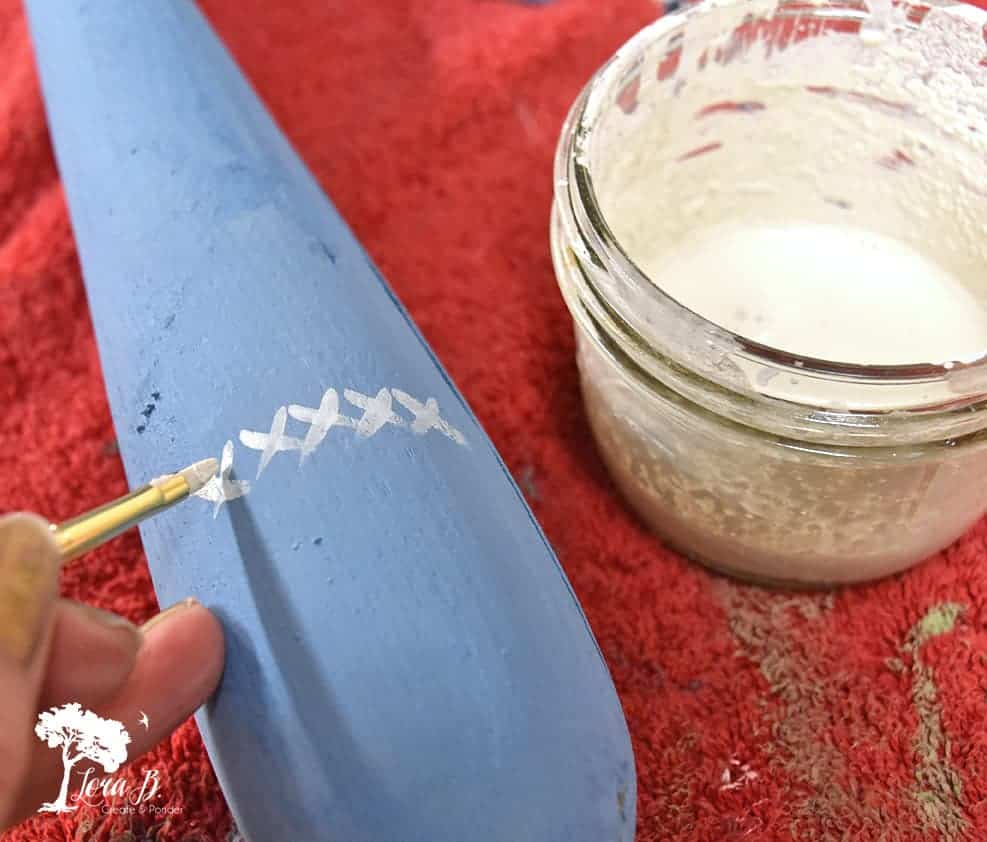
I also added handpainted details, similar to the patterns on the Shiny Brite ornaments. Just simple leaves, flowers, lines and X’s. Nothing too hard. It just gave these repurposed candle holders folkish charm.
To finish their beauty treatment, I lightly sanded and distressed with 120 grit sandpaper and sealed with Miss Mustard Seed Hemp Oil (get it HERE). The hemp oil moisturizes the wood and gives an old world style finish. It deepens the paint color and brings out the beauty of the wood showing through.
The legs that already had great vintage chippiness got a brushed on coat of my favorite polyurethane to seal and bring out the color.
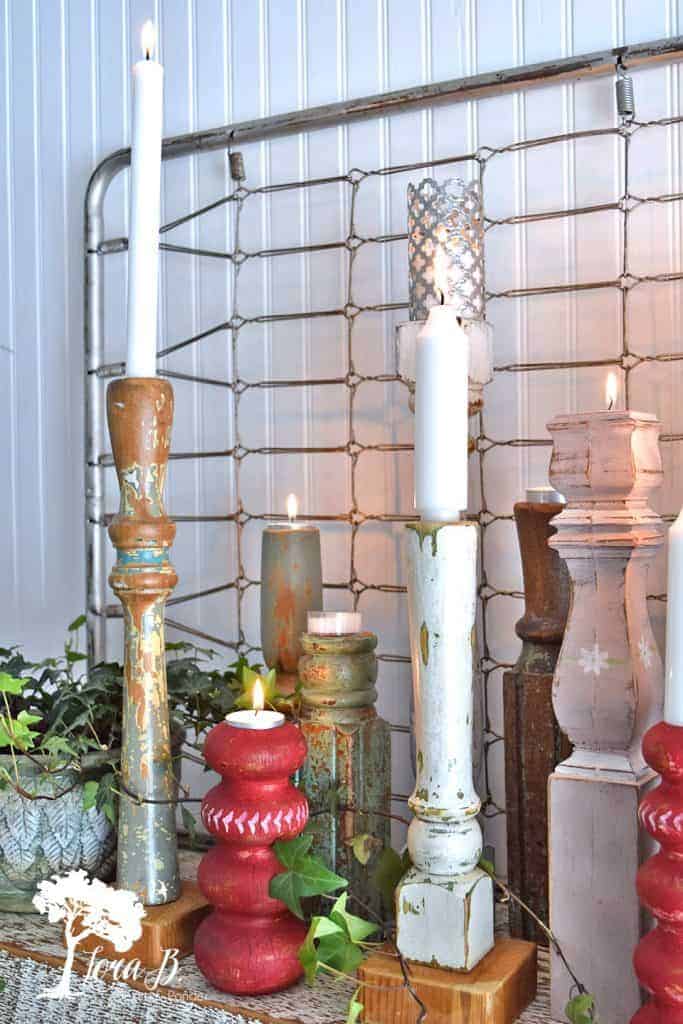
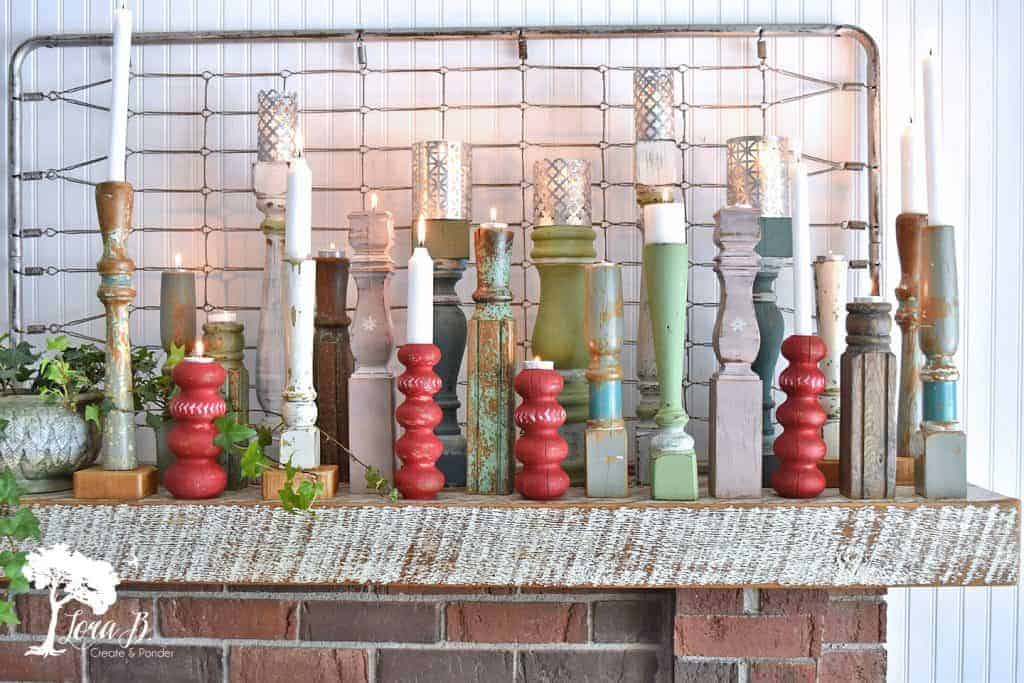
Decorate with Your Beautiful DIY Repurposed Candlesticks
Ready for the big reveal? I marched them across the mantel and lit the candles, sliding the sheet metal shades around. So much prettier than their previous life in the garage! Thrifty makeover, indeed! (Actually trash to treasure;)

I’ve had this project in my mind for a long time; I’m so glad this Thrifty Style Team challenge inspired me to finally get them done!

Shop the Products to Make:
Miss Mustard Seeds Milk Paints (Use code 10OFFLB for discount)
Miss Mustard Seed Hemp Oil (Use code 10OFF for discount)
The boys got the garage looking a little better and I got some beautiful “new” candlesticks to decorate with for Christmas. Win/win for this Thrifty Style Team makeover!
I hope you enjoyed my DIY Repurposed Candlesticks with Sheet Metal Shades!
Pin, Share and Enjoy the Rest of the Inspiration!


The Painted Hinge – Vintage 7UP Crate Christmas Centerpiece
DIY Beautify – How to Make a Glitter Ornament Nativity
2 Bees In A Pod – Stamped Book Stacks For Christmas
Postcards From The Ridge – Easy DIY Snowman Wreath
The How To Home – Copper Geometric Christmas Ornament
The Tattered Pew – Easy Homemade Christmas Soaps For Kids
Sweet Pea – How to Make Christmas Cut Out Wooden Candleholders
What Meegan Makes – Glittery Christmas Wreath From An Embroidery Hoop
Cottage At The Crossroads – Wooden Chinoiserie Christmas Ornament
I Should Be Mopping The Floor – How To Make Christmas Tassels
Lora B Create & Ponder – DIY Repurposed Candlesticks with Sheet Metal Shades
White Arrows Home – DIY No Sew Christmas Pillow
This is such a clever idea Lora! I’m so happy that you are one of our Charming Homes and Gardens features this week. It was hard to pick just one feature! Thank you for sharing with us!
Thanks, Kim! Yes, there are so many beautiful homes and projects this time of year; I don’t know how you choose!
Lora,
These are all so cute. Look for your feature on Wednesdays Charming Homes & Garden Link Party
Rachel
Wonderful! Thanks for the feature, Rachel:)
These are so fun, Lora! I love the sheet metal shades, too! Thanks for sharing at Vintage Charm!
Your welcome, Cecilia!
Wow, your repurposed candlesticks look amazing and they look so good grouped together!
Thanks, Allyson! Yes, I love them en masse;)
Thank you so much for sharing these with us at Farmhouse Friday Lora!
Your welcome, Michelle!
This is an absolute adorable idea. I have a crock full that I need to do something with. Pinned (to 3 different boards) and need to get on this. Love it so much I chose this for one of the features on the Farmhouse Friday Link Party! Thanks for sharing it. Great tutorial too.
Wonderful, Cindy! Thanks:) Glad you enjoyed it; will pop over and say hi!
Wow! Is this amazing Lora!! Your creativity always leaves me in awe!! These are sooooo beautiful! I love how they turned out!!
Aw, thanks Kristin!
Lora, I’m seriously smitten with all of these gorgeous candlesticks. What a fantastic repurpose. And your mantel looks incredible with the entire display. Have a lovely holiday season. xoxo, Kristi
Thanks, Kristi!
Lora I love these so much! I adore MMS Milk Paint and I love how you used it to add beauty to your DIY candlesticks! I also know where to go if I am in need of old furniture legs! Pinning!
Thanks, Kelly! I love MMS milk paint, too. I’ve painted so many pieces with it through the years, but this project was something new, indeed!
Lora,
You are just amazing! First of all making these into candle holders, then painting each one, even then-you made SO many! I am so impressed with your handy work and love your style. Thanks for sharing and inspiring me.
Thanks for your sweet words, Meegan:) Well, I kind of had to prove to the fam that keeping my stash was worthy potential! Honestly, working in bulk is a shop owner habit I will probably have forever; plus I can enjoy all the different colors separately throughout the year! Glad you were inspired!
These are so stinkin’ cute Lora! I love the variety of shapes and colors and the metal shades are the perfect finishing touch! So gorgeous! Well done my friend!
I really had a fun time with these, Michelle! I kinda want to make another dozen…but think I better decorate my house for Christmas first;)
Lora, This is UNBELIEVABLE! The options are absolutely endless!! I am so happy you joined us!!
Thanks, Julie! Fun to see all the ideas from a new group!
These are absolutely GORGEOUS, Lora! I want a whole mantle full of them. Pinned!
Thank you, Mary Beth:) Now I’m excited to fill the mantel in with the rest of my Christmas ideas!
Lora,
I love this idea. I have a few table legs and spindles in our garage and hope to do this with them eventually. Love the colors you used too!
Thanks, Angie! I had so much fun with them:) Excited to use them all through the year.
What a fabulous repurpose, Lora! Love the rustic charm of these and the DIY metal shades are very clever.
Thanks, Marie! They are starting out my Christmas decor!
These are so clever! You did such a great job using our paint! 🙌🏼
Thanks, Jenn! This is the first project; had to readjust my ideas a bit;) But got to use more colors this way!
Oh I love how these turned out Lora! You had a great stash to work with! The colors look great and I love the added hand painted details!
I had a sizable stash to work with, Cindy:) I probably should make a couple dozen more!
Wild and crazy for these. Please consider posting them at Funtastic Friday.
Thanks, Michele! Will try to pop over:)
What a great way to upcycle furniture legs! You created beautiful candle holders that you can enjoy as a group on your mantel for Chrsitmas and then separately for decor in any season.
Thanks, Paula!
I have quite a few spindles and this is really so perfect, thanks Lora. I love what you did!!
Thanks, Marlene! I should probably do 50 more;)