
Vintage Seed Packet Flower Pot Wreath (that’s not heavy)
Craft this vintage seed packet wreath with peat flower pots for a lightweight, inexpensive garden theme decoration. Cute porch decor DIY.

Spring into summer is the time to celebrate all things gardening and flowers! And what better way than to craft an easy wreath you can hang in your porch. I’ve admired all the creative clay pot flower pot wreaths people have been making, but wanted to come up with a lighter version. Using peat pots is a great alternative. This Vintage Seed Packet Flower Pot Wreath (that’s not heavy) is a simple DIY you can make for yourself, or as a gift.
Vintage Seed Packet Flower Pot Wreath (that’s not heavy)
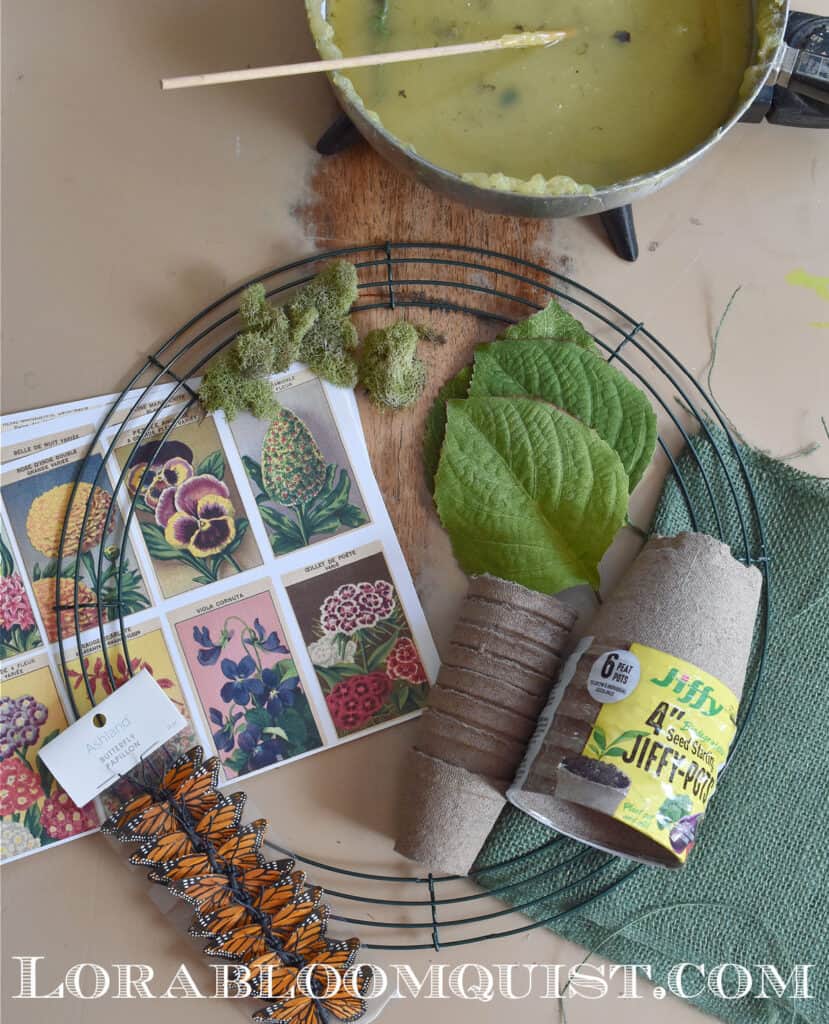
Materials Needed
For your convenience, this post contains affiliate links. If you make a purchase, I may receive a commission. There is no additional cost to you. My full privacy policy is here.
Make Peat Pot Wreath
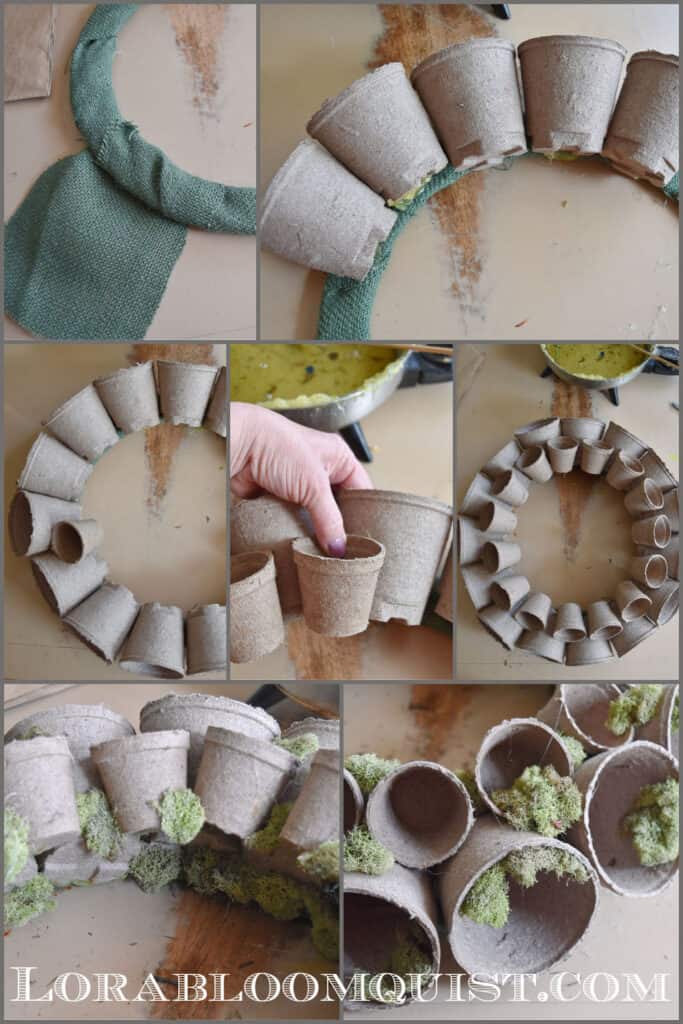
- To start, wrap burlap around wreath form, hot gluing to begin and end. This will cover the wire and give you a better surface area to glue.
- Heat hot melt glue pellets in an old electric fry pan or a glue skillet. For a big project, this is so much easier than using a glue gun.
- Glue 4″ pots all around the wreath form, facing out. Vary the angles a little for interest.
- Glue smaller peat pots on top, in between the larger sized ones.
- Glue clumps of lichen in and around all the pots; be generous. You could also use moss, but it is messier. Purposely make it look random. Glue on the inside of the wreath to cover any burlap showing.
For a more subtle look, the wreath could be used just like this!

Decorate Flower Pot Wreath with Vintage Seed Packet Printables

- Print off vintage seed packet printables onto cardstock. You can find a beautiful variety HERE. What type of cardstock you use can change the look; bright white will make the colors look saturated, a light craft paper will give a more subtle look.
- Cut printed seed packet printables, leaving a margin around. Snip the corners diagonally and fold sides to back, so it looks more like a seed packet from the sides.
- To make the printable seed packets look really vintage, brush matte modge podge on front, like you’re painting the illustration. Once dry, the paper will resemble that old paper vintage seed packets were made from.
- You can see the difference here: the one on the left has had modge podge, the one on the right regular paper. Now you don’t have to hunt down the old seed packets; just make them yourself!
- To make the seed packets thicker on the wreath, hot glue to a square of paper burlap. Mine is textured, but plain will work, too. This paper comes in a scrapbooking stack and is so great to have for projects.
Glue Decorations to Flower Pot Wreath
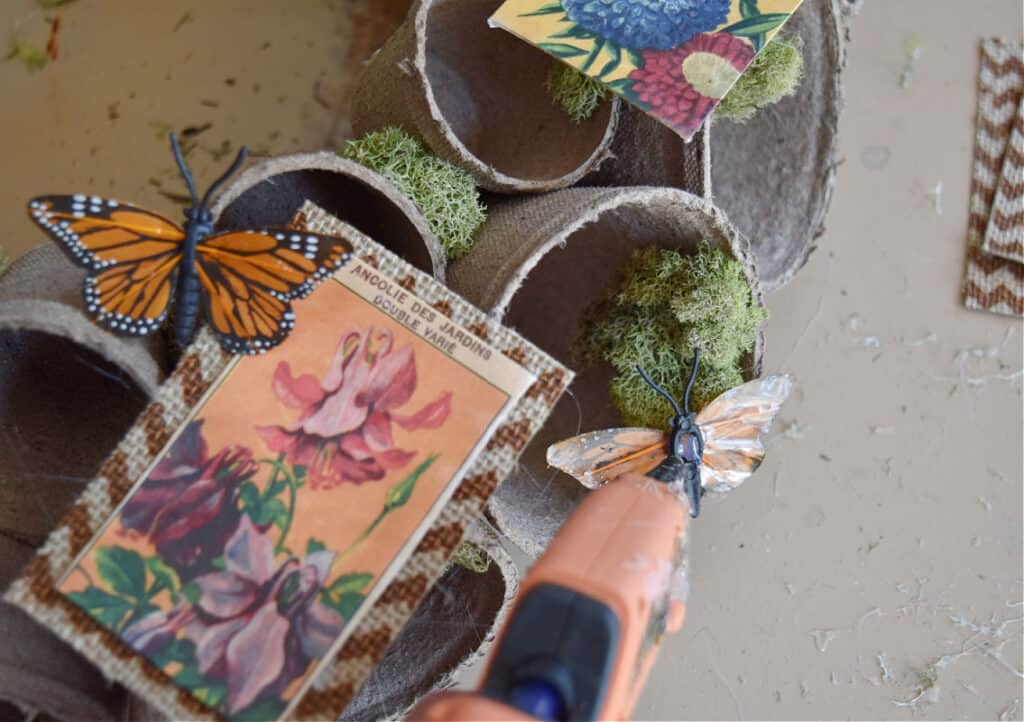
- Using a hot glue gun, glue seed packet art to wreath. I used 6 (and it was hard to choose, because they’re all so pretty…time to come up with more crafts for these;)
- Hot glue butterflies all over, varying their direction for a lifelike appearance.
You could add succulents or leaves if you wanted even more texture. I wanted to keep this one simple and classic.
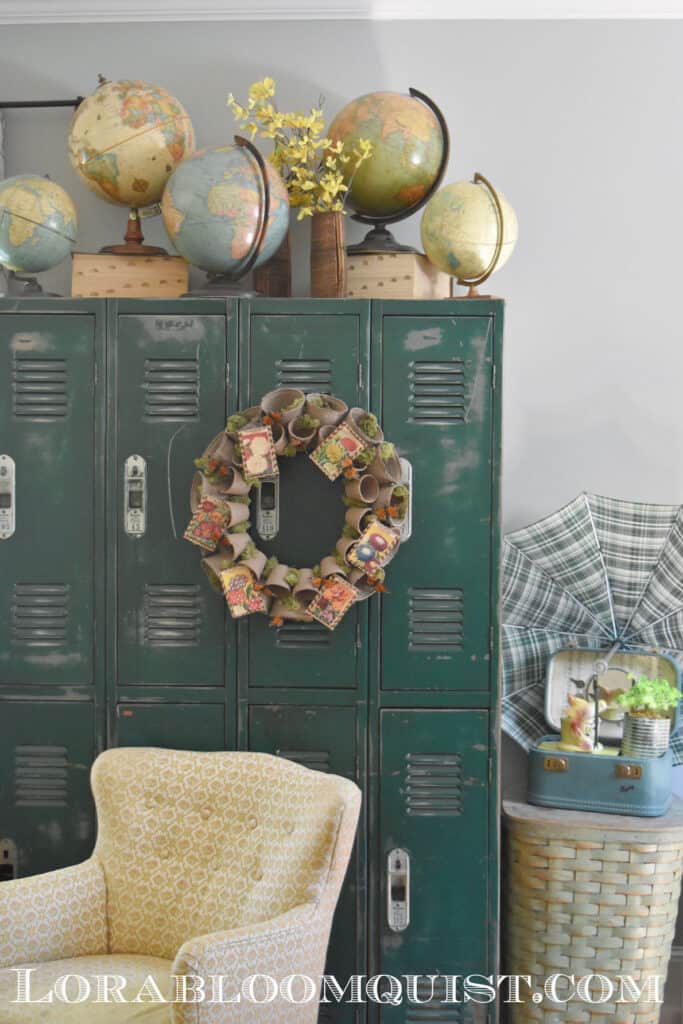
The Finished Garden Theme Wreath
This was a fun project to get me in the mood for gardening season! It will be a great addition to my garden-themed vintage decor. It could be a fun DIY gift idea for mom or any garden-loving friend!


For more garden-inspired projects and decorating, see HERE.
If you enjoyed this Vintage Seed Packet Flower Pot Wreath (that’s not heavy), be sure to sign up to become an Insider, to get the ideas sent directly to you! (sign up HERE)
Follow Me: LTK | Amazon | Pinterest | Instagram | Facebook
Pin and Save


Sharing at these lovely parties:
Lora, this wreath is FABULOUS!
I’d love for you to join us over at the Creative Crafts Linky Party every Wednesday through Sunday
Followed and Pinned!
Creatively, Beth
Glad you liked it, Beth! Will try to remember to pop over; thanks for the invite:)
I love your lightweight flower pot and seed packet wreath, Lora! So pretty, and perfect for inside or on the patio! I’m so happy to be featuring your post at this week’s party! Pinned!
Wonderful; thanks for the feature, Julie!
Would also make a beautiful centerpiece and could have plants in the pots instead of seed packets.
Yes, it totally would; great idea!
Very pretty and so spring-like!! I’m wondering how it might look with the pots painted a terra cotta color? . . . to get the look without the weight, and pick up on the colorful seed packets. I’ve never tried painting Jiffy Pots . . . would they soften and warp if painted???
I think it could work if you dry brushed them or used a floral spray paint that’s lighter. It would be easy to try it on one and see; I like that idea!
Lora,
This is just the cutest and I can’t wait to share on my Sunday Dirt Road Adventures. You are so creative.
Thanks much for sharing, Rachel!
Love this sweet wreath…I really like the use of the peat pots!! Great idea!! Thanks so much for sharing!!
Hugs,
Deb
So glad you like it, Debbie!
This is the cutest seed packet wreath I’ve ever seen! And I love that it’s not so stinking heavy. Thank you for sharing it with us on Farmhouse Friday. Featuring it this week. pinned
Glad you liked it, Cindy; thanks for the feature!
Super cute Lora. I love that you’ve used peat pots and butterflies too! The other ones can get pretty heavy!
Yes, I love the look, but have never been able to get past the weight…I’d probably drop it and break it all:(
What a genius idea to use peat pots for a lighter version. Your wreath looks so pretty! Here via Fabulous Friday.
Glad you enjoyed it, Allyson!
Hi Laura!
Lovely! The peat pots are a clever and inspiring idea. Peat pots are going on my list of “DIY Use This – Not That”. (I really do have this list!) Thank you for another wonderful wreath – one of my favorites is your Recycled Garden Hose wreath!
Glad you enjoyed it, Beth! I actually need to make 2 more of those garden hoses wreaths for my picket fence garden gate…maybe after I get all the seeds and plants planted;)
This is a super cute idea! I love it.
Thanks, Renae!
SUCH a cute project, Lora!! I Love how you used those peat pots…so clever! The moss and butterflies really add to the ‘garden’ appearance of it. Pinned!!
Thanks, Rachel!
So cute and springy! Thanks for sharing your tutorial!
You’re so welcome, Patti!