
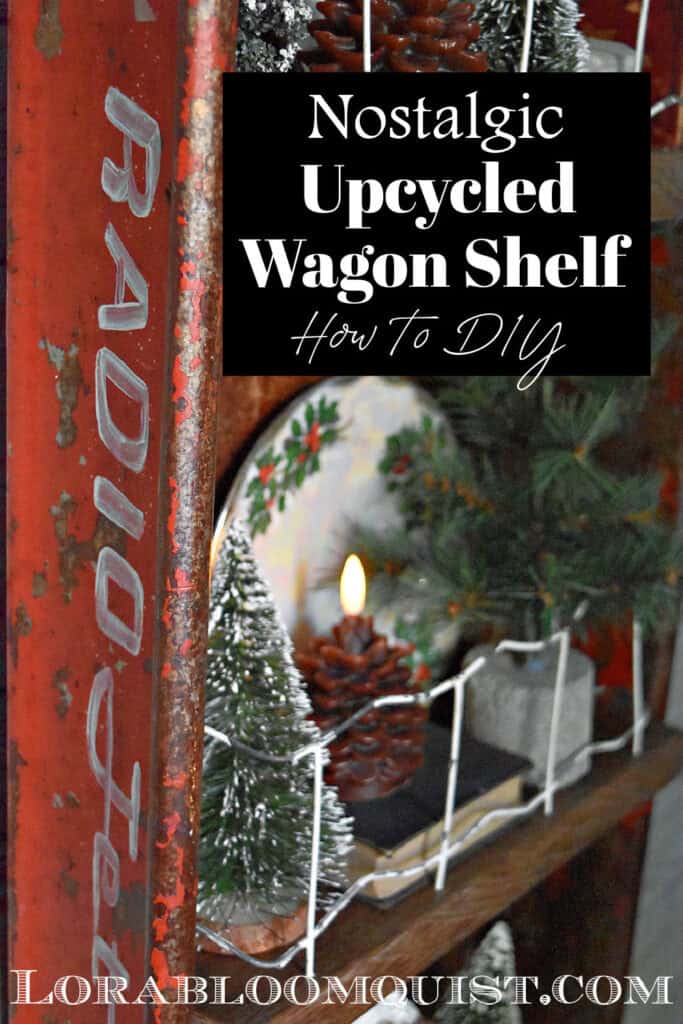
DIY Upcycled Old Wagon Shelf with Nostalgic Charm
Do you have an old red wagon? This upcycled old wagon shelf will add charming nostalgic style to your home. Here’s the simple DIY to repurpose a childhood toy into a fun and unique home decor accent.
Sometimes project ideas brew in my head for quite awhile before they finally happen in real life. Maybe it’s because I have so many ideas, my (& Mr. Fix-it’s) hands can’t keep up? This cutie is one of them. Which makes it all the more fun to show you! Hope you are inspired by this DIY Upcycled Old Wagon Shelf with Nostalgic Charm.
Today’s project is part of our bi monthly Lifestyle of Love series, organized by Cindy at County Road 407. We’re a small group this round, because the busy holiday season is upon us. But I’m sure you’re going to enjoy all the fun ideas today. We’re focusing on wagons and carts.
If you’re visiting from Decor to Adore, I’m sure you enjoyed seeing Laura’s collection of vintage favorites and how she used them on her Thanksgiving table. I always enjoy her creativity. I’ll have the rest of the inspiration at the end.
DIY Upcycled Old Wagon Shelf with Nostalgic Charm
For your convenience, this post contains affiliate links. If you make a purchase, I may receive a commission. There is no additional cost to you. “As an Amazon Influencer, I earn from qualifying purchases.” My full privacy policy is here.
Repurposed Vintage Parts: More Interesting Than the Whole
I’ve long had a philosophy that sometimes the parts are more interesting than the whole. Which translated means…if you’re not using something in it’s current state, but still kinda like it (and are sentimental about it), take it apart.
By taking it apart, you multiply the decorating, upcycling and repurposing potential! Yes, it’s vintage blasphemy to some purist antique lovers, but I don’t take it personally and neither should you;)
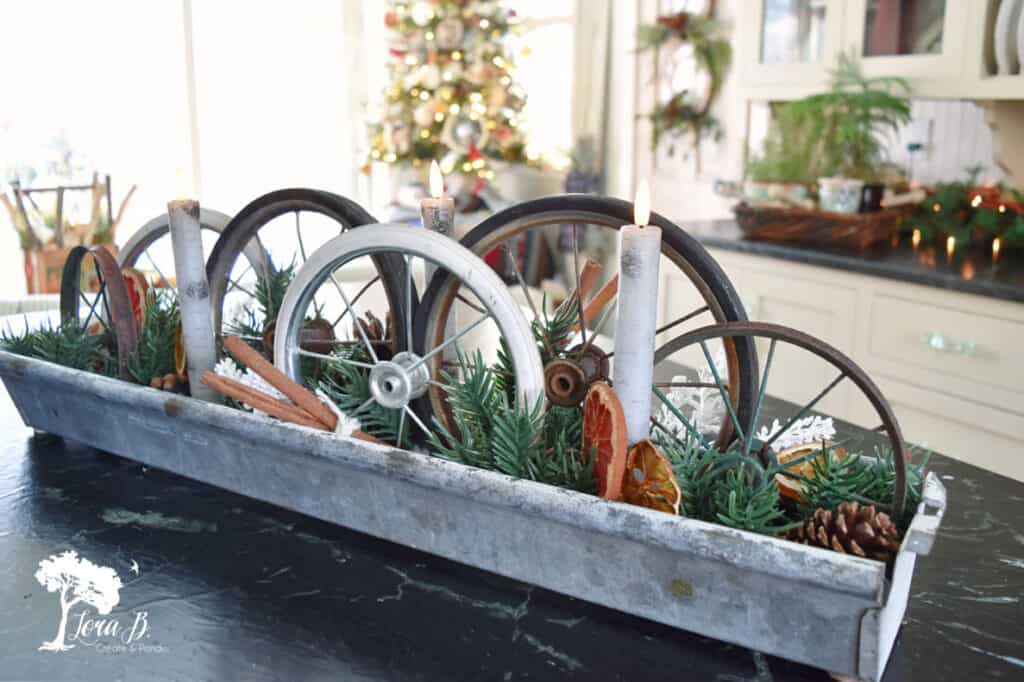
Which is how my childhood wagon came apart. Think I first wanted the wheels. I have a thing for old wheels. My collection is still growing. One year vintage wheels filled our Christmas decorated kitchen.
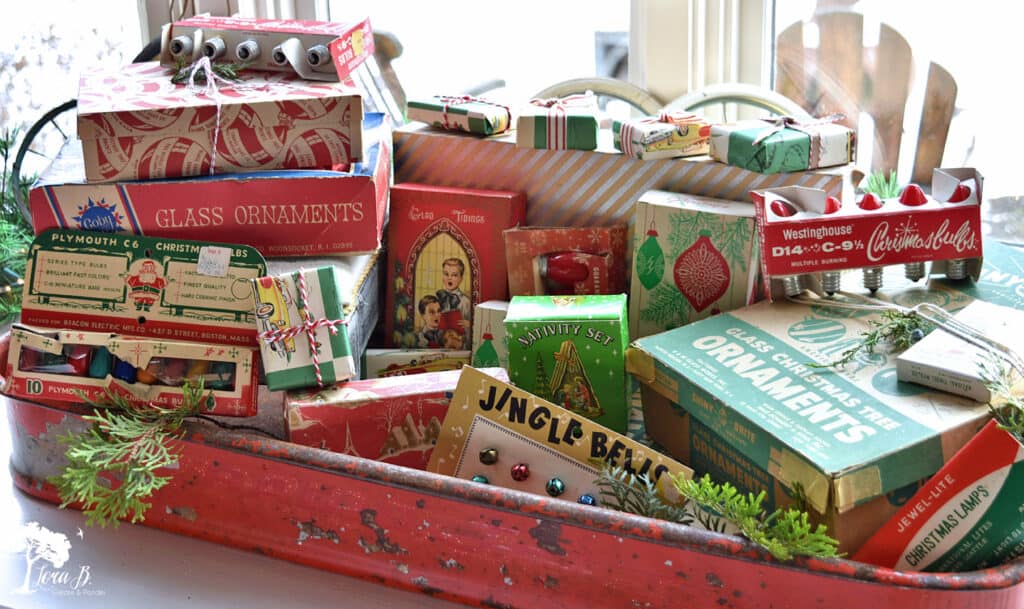
I repurposed the wagon seat as a display for vintage boxes with cute graphics. But I still had the idea in my head of turning it into a wall shelf. Here’s how we finally did it…
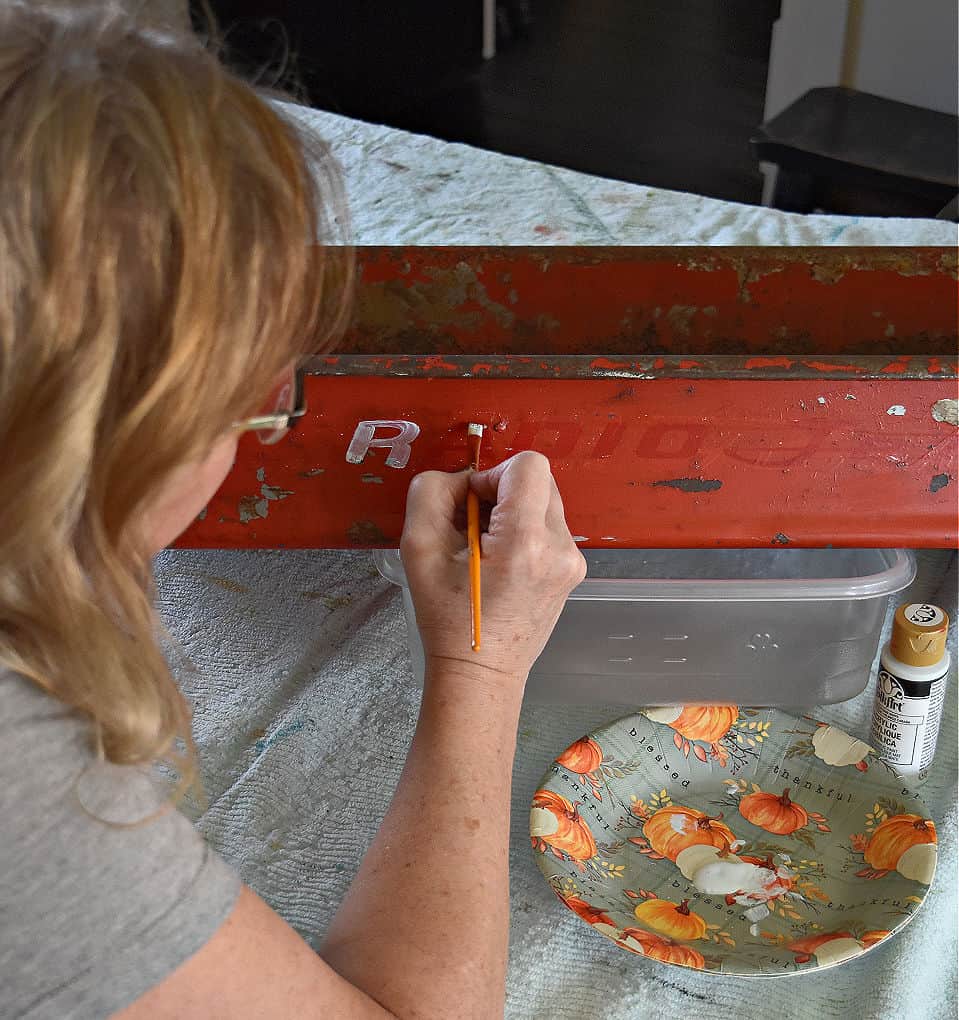
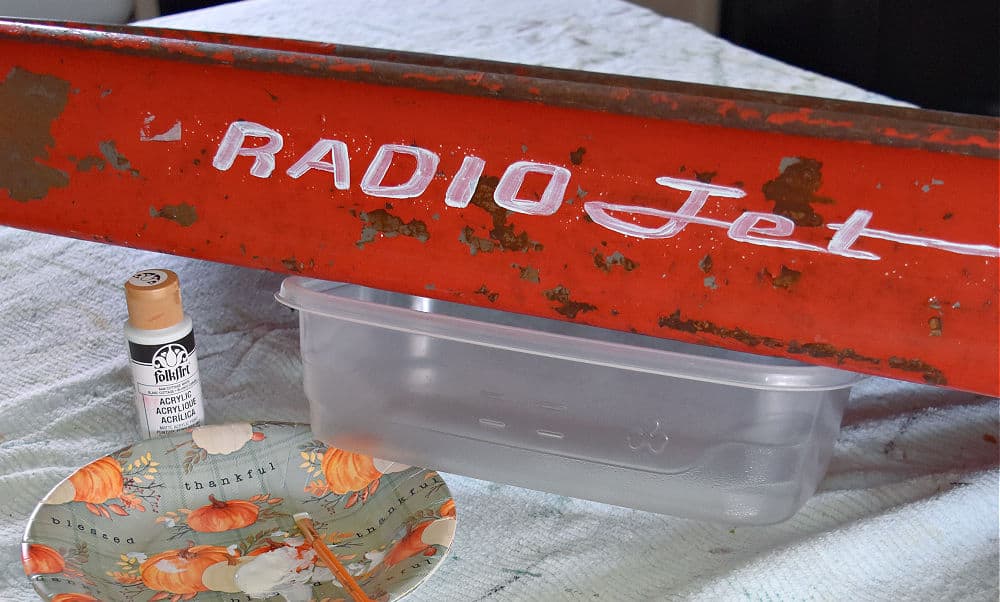
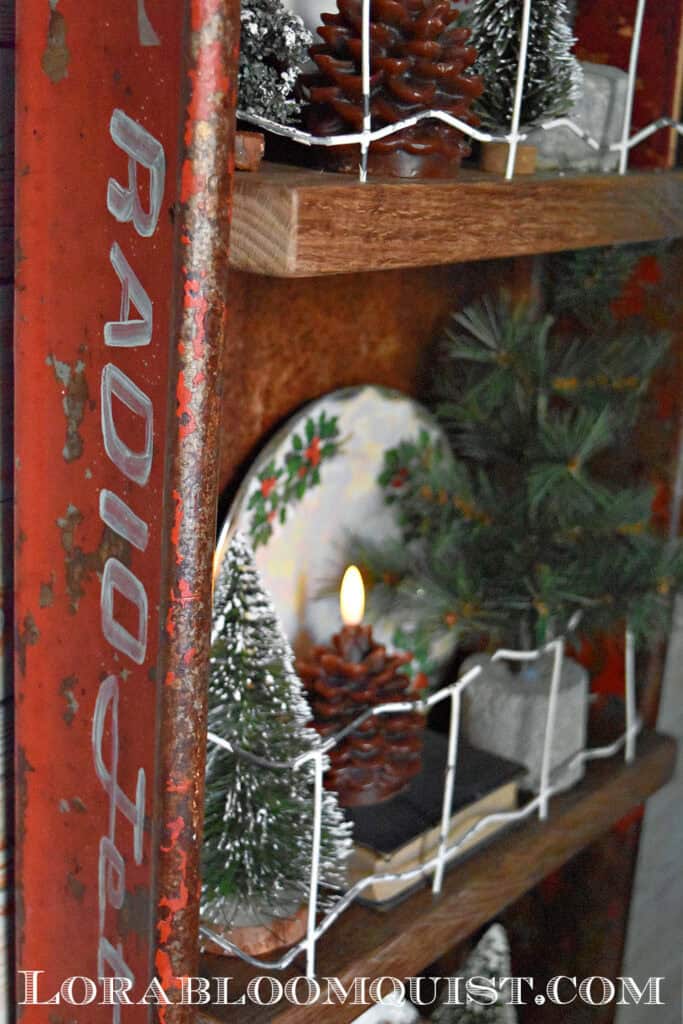
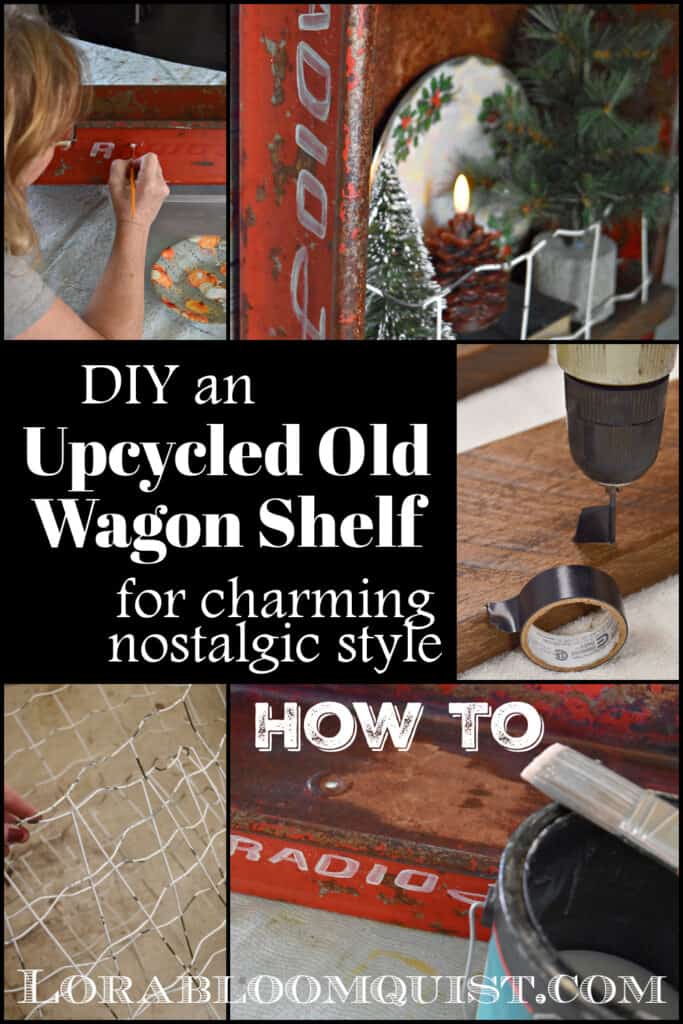
Repaint Wagon’s Words
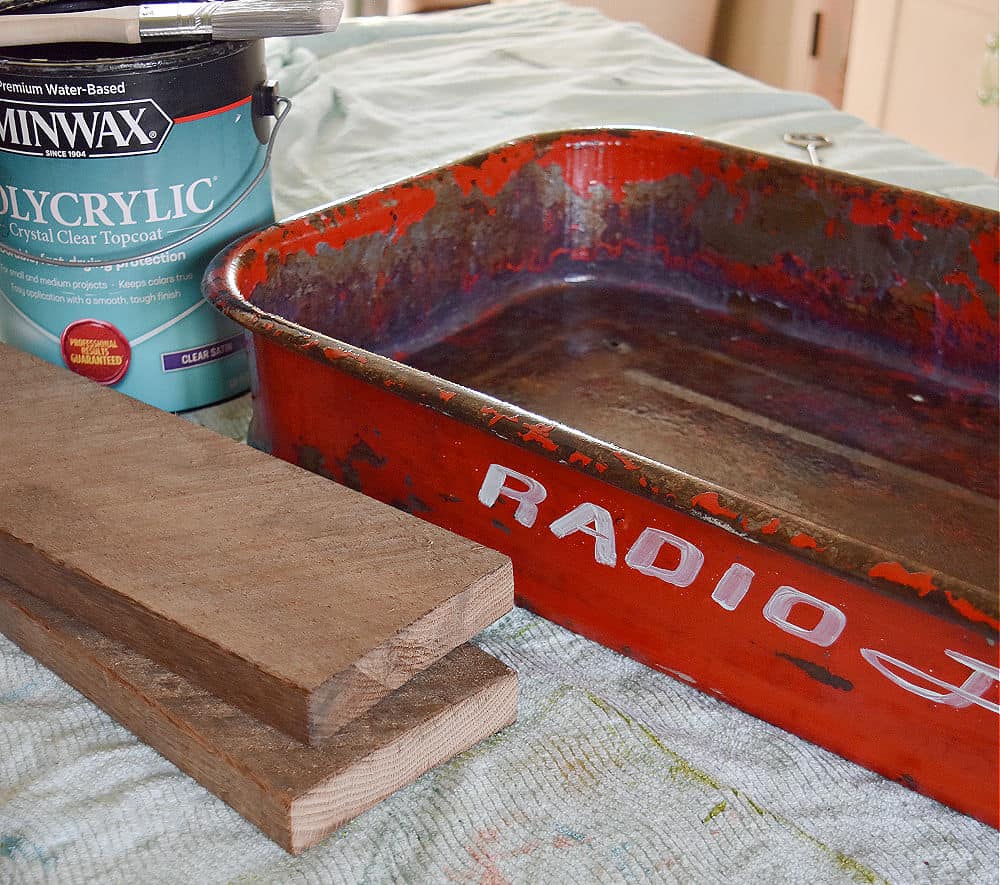
The original words had been scrubbed off, but you could still see them. I grabbed simple white craft acrylic paint and a small brush and hand painted the words back on.
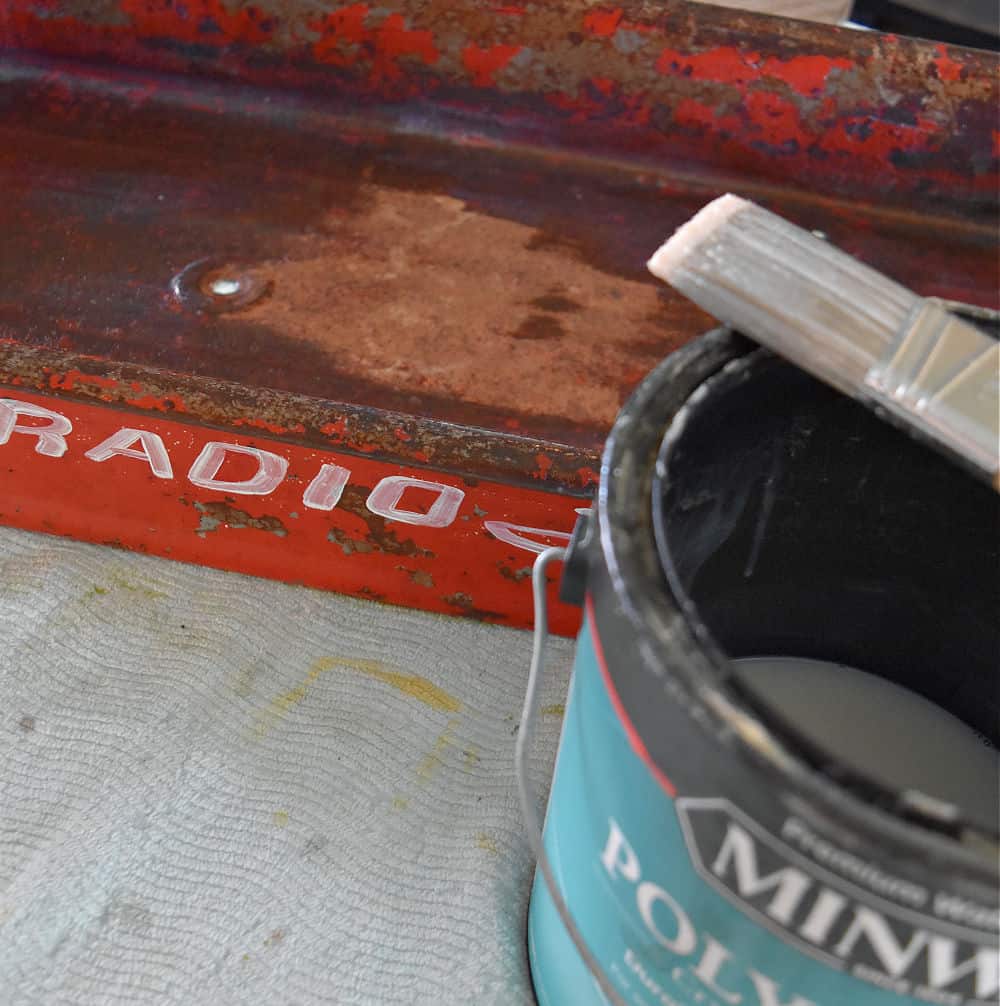
Seal Rusty Metal with Polycrylic
I had scrubbed the rusty metal surface with an SOS pad years ago. I had brushed the back and sides with my favorite poly, but I’d never gotten to the inside. You can see the difference it makes-the original surface is just bland. Once you poly that old rusty metal, it turns beautiful.
Mr. Fix it cut a couple shelves for me out of our stash of rustic barn boards. I sanded them and gave them a coat of poly too.
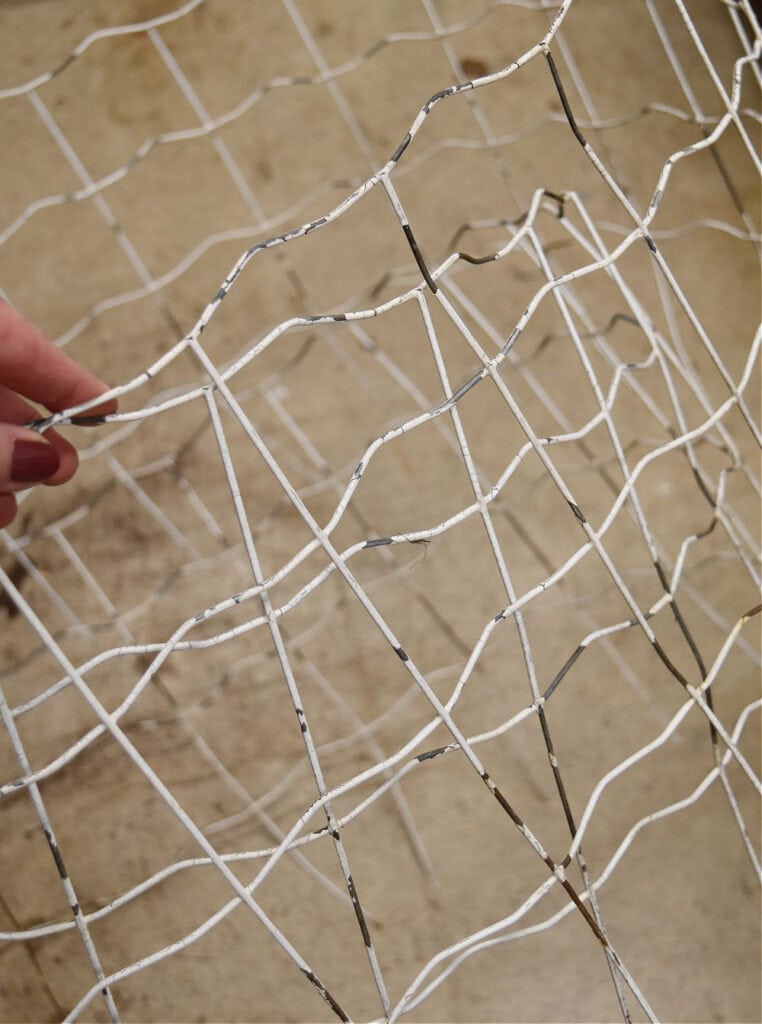
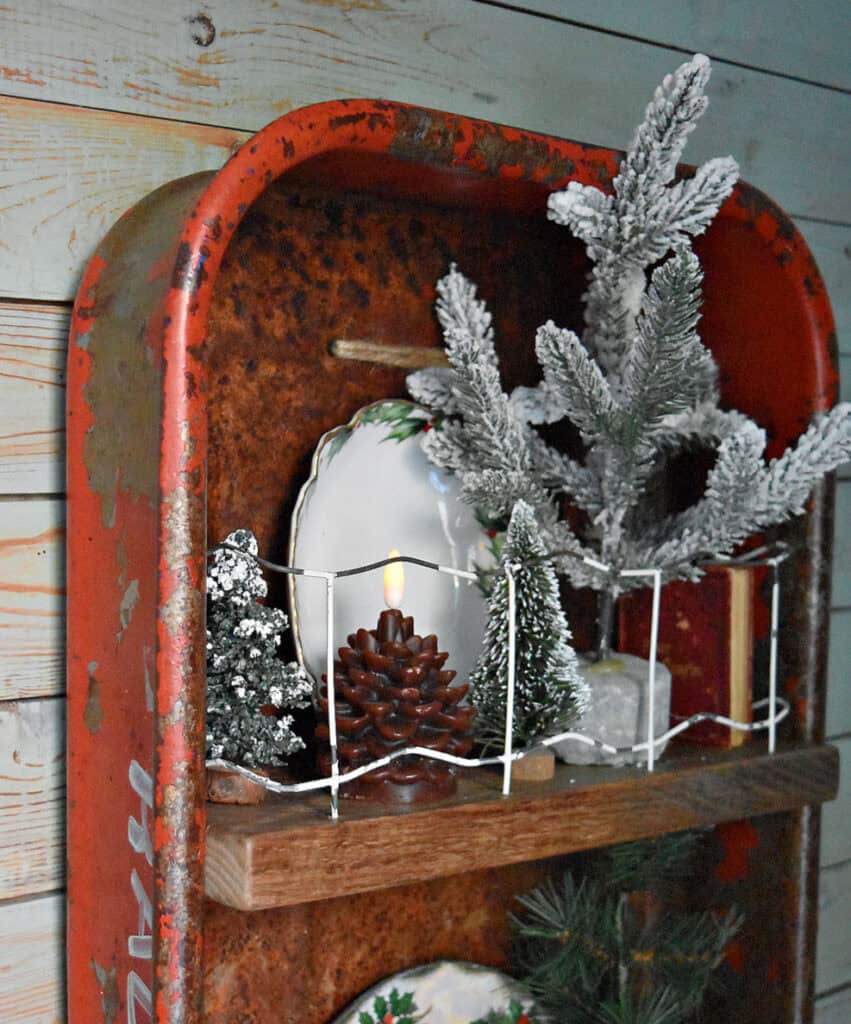
Adding Vintage Wire to the Shelves
I wanted the front edges of the shelves to have white vintage fencing, for added cuteness. I realized I was out of the scalloped edge type we made the Upcycled Old Garden Fencing Cloche‘s with. Mr. Fix it made 8 of them for Happy Girl’s wedding last summer.
A girl’s gotta get creative with the junk she has on hand. So I found a roll of this type of white wire. It would have to do.
Constructing the Upcycled Old Wagon Shelf
First Mr. Fix it cut a wire piece long enough to wrap around the front edge a little. This is just the top 5-6″ of the fencing. He drilled the first hole where the end of the fencing would be inserted.
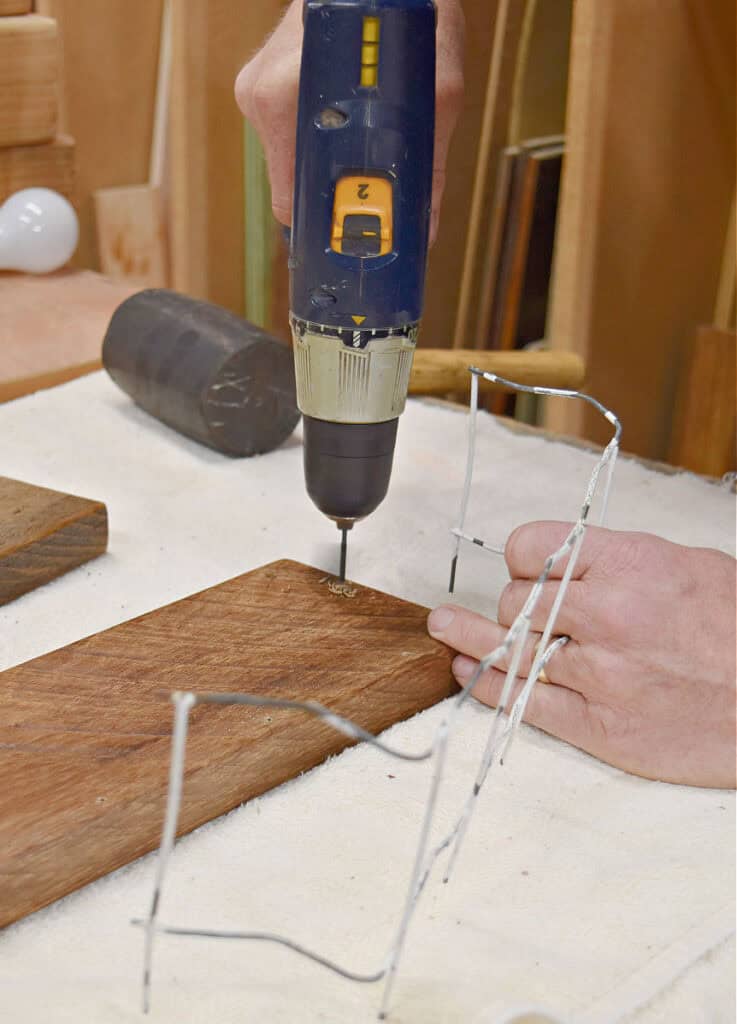
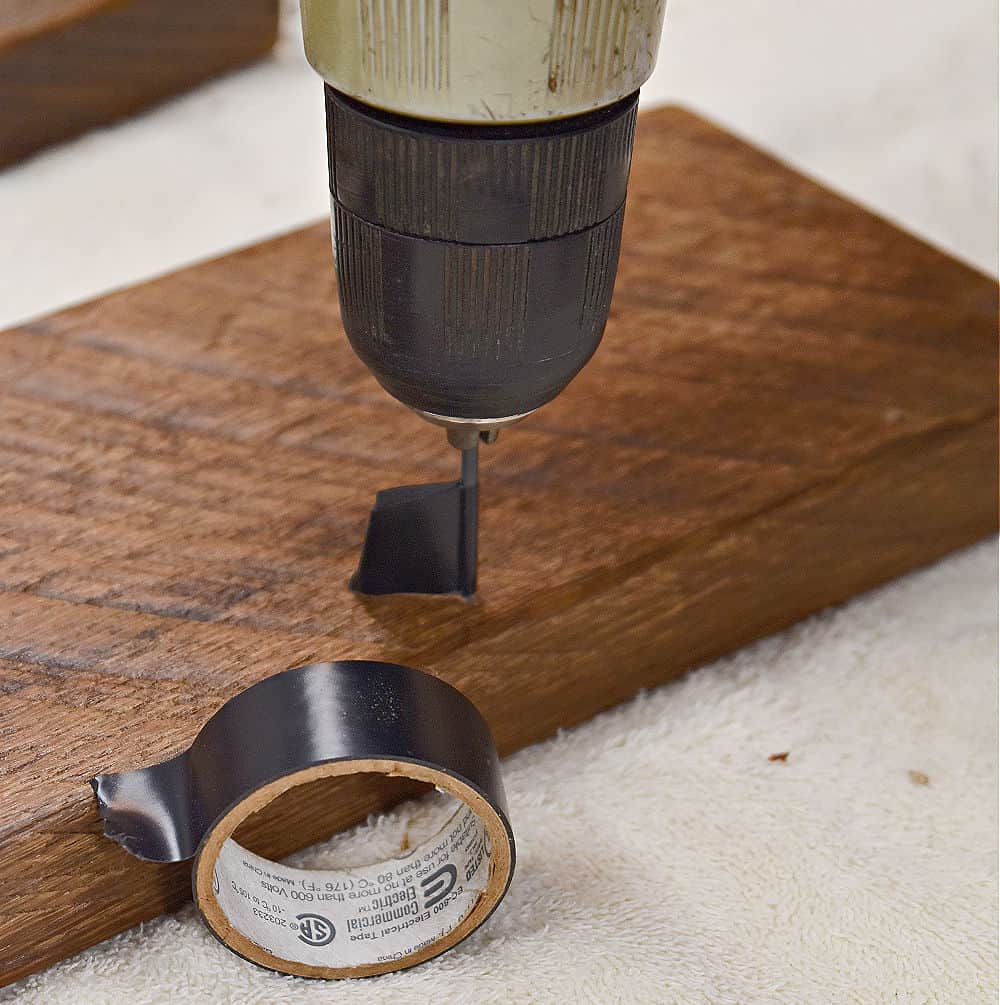
Then to make sure each of the holes were the same depth, he did something brilliant…he wrapped the drill with a piece of electrical tape. What a handyman tip! I’d never seen him do this before.
He knew he had to stop drilling when he got to the tape. Then he could get each hole the same depth. Working alongside someone gives you apprentice-like knowledge;)
Once the fencing was put in, it was time to screw the shelves into the wagon seat. He put one screw on either side and two in the back of each shelf. We always use old rusty screws for these types of projects. Whenever we come across some, we add them to our stash.

Ready for the Big Reveal?
I couldn’t be happier with how this old red wagon shelf turned out. It is going to be fun to use year round for different seasons. And it doesn’t take up much space. It looks great in our back entry as a seasonal hello. I hung it simply by stringing jute twine through a couple of the existing holes.
I quickly popped some Christmas church sale finds onto the shelves along with cute wax battery operated pinecones. (find the pinecone candles HERE)
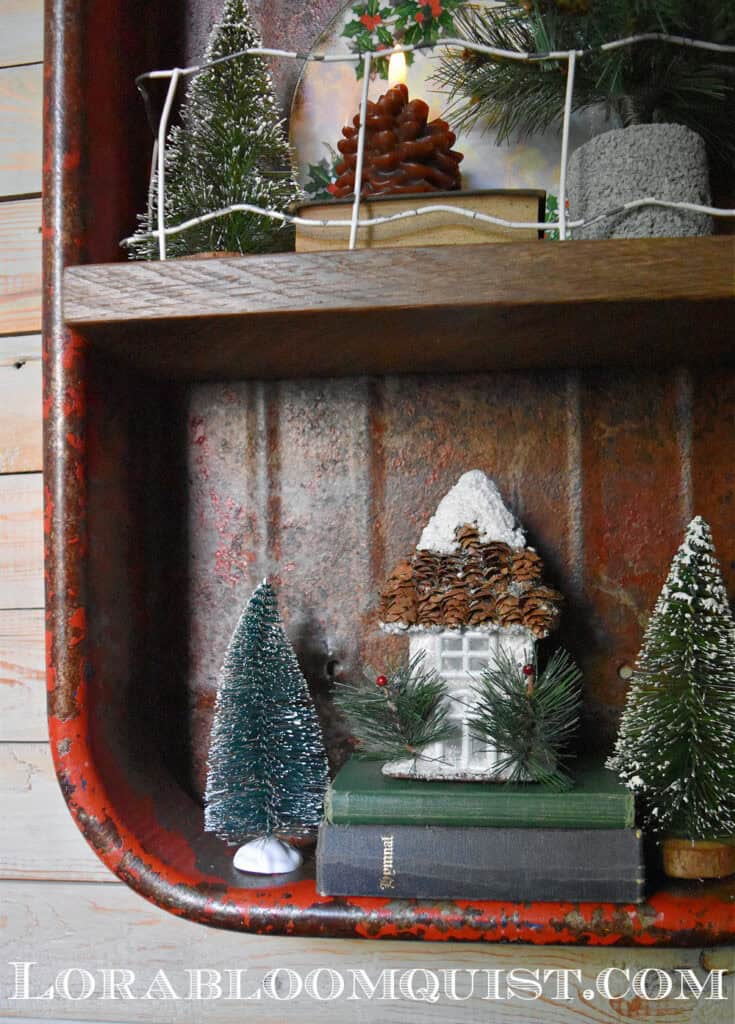
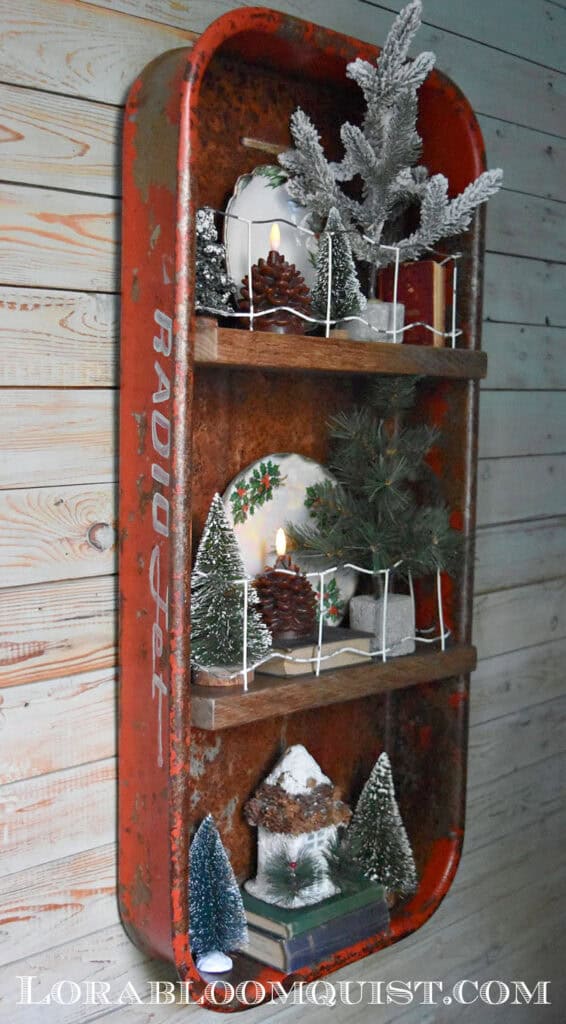
Such a fun project to finally see realized! If you’ve got an old wagon laying around that’s not being appreciated, or you spot one when you’re out treasure hunting, upcycle it! This would be adorable in a kid’s room, too. Or displayed in a nostalgic family room with old pictures.
For more of our Lifestyle of Love series, see HERE.
Check out our host, Cindy, at County Road 407’s post next; she created the cutest winter wonderland dessert table! All of the posts are also at the end.
Thanks for reading DIY Upcycled Old Wagon Shelf with Nostalgic Charm. If you enjoyed your visit, be sure to Become an Insider so I can send the ideas right to you! You can Sign Up HERE.
Follow Me: LTK | Amazon | Pinterest | Instagram | Facebook
pin, save and enjoy the rest of the inspiration!

Sharing at these lovely parties:
I love all the ideas you have but I think this I my favorite. I absolutely love this
So glad you enjoyed it, Jean! I’m excited to switch it up to Valentine’s now:)
Loved seeing your old wagon preserved for posterity with a great new use! I wish I had our childhood wagon. I remember my mother using it to haul garden tomatoes in! It was large enough to hold my brother and me!
Yes, my brother and I used to get pulled in this one, too, Kathy! Glad I still have it and can enjoy it a new way.
This is really adorable…when I had a shop I made shelves out of just about anything, of course soda crates were the best…for displaying goodies. but this is totally the BEST, and I really like your little fence. I can just imagine a favorite Teddy sticking his legs through…fun stuff..PINNED this one! Sandi
So glad you enjoyed it, Sandra! I’m excited to use it all year long:)
Oh my goodness, that wagon is too cute! What a great idea to repurpose a bunch of stuff. Kudos to Mr Fix-It too.
Glad you enjoyed it!
This may be the cutest upcycle yet! I love the wheels on the table centerpiece and making shelves with the fencing is genius! I love it all!!! Just having the seat to the wagon filled with old boxes or anything else for that matter is hard to beat. Thank you for sharing your talents. pinned
Thanks, Cindy!
Love that~ what a great idea to repurpose your wagon. I like the sealer you put on the old rusty thing~! The shelves look great. You have some wonderful ideas for repurposing found items – or old things you upcycle and update. Thanks for sharing.
Glad you enjoyed it, Barb!
What a fun idea, Lora. You always give me so much inspiration. I LOVE the patina on that incredible wagon. I wish we had a place to get crafty here, but then I’d need your amazing brain full of unique ideas!! Happy Thanksgiving, Lora!
Thanks, Debra:) Happy Thanksgiving to you, too!
So cute and a great idea. Mines outside with sedum planted in it. I also collect wheels. You always inspire me with all you create, thanks!
So glad someone else appreciates the old wheels, Marlene! I’ve added quite a few to the stash this year. Watch for them for Christmas;)
This is such a fun piece to show off your vintage “smalls”. I have a vintage wagon but I don’t have a Mr. Fix it! You’re a great team.
Thanks, Roxi! Yes, we are:)
OMG SO cute, Lora!! What a creative way to use such a special item.
Looks so pretty styled for Christmas!
Love your creativity!! Love this idea!
So glad you enjoyed it!