
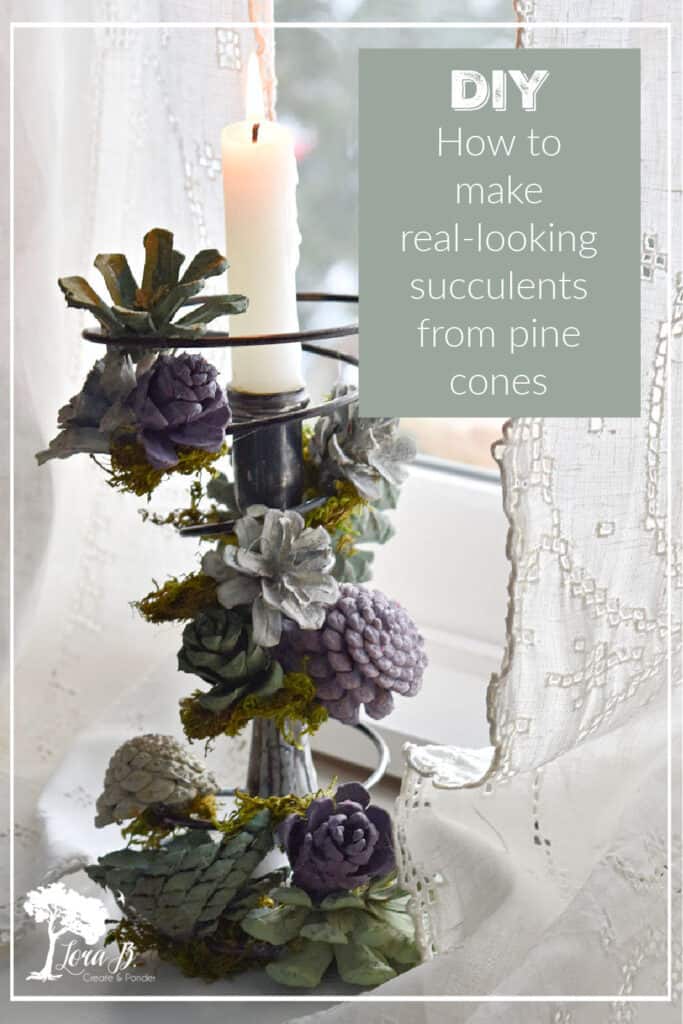
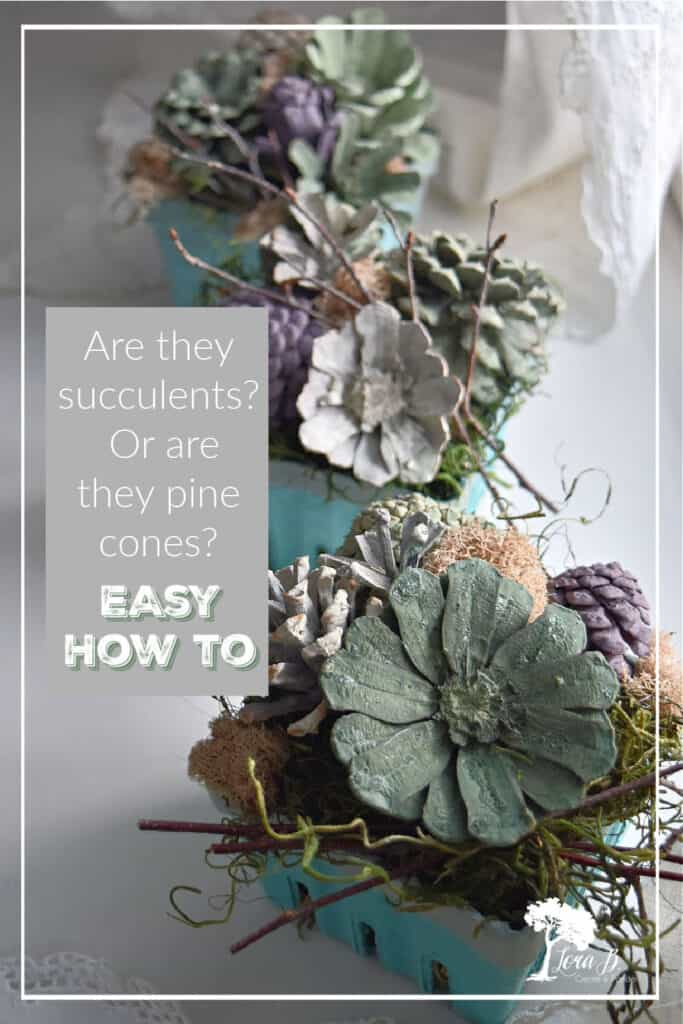
Easy DIY Pine Cone Succulents
what can you do with pinecones? Upcycle them into realistic looking succulents with Milk paint. Here’s how!
What can you do with pinecones? They’re such an easy material to find; why not upcycle them into something you can decorate with? For your crafting pleasure, I figured out a way to transform the humble pinecone into something amazing. All you need is a little paint…milk paint, that is. Here’s how to make Easy DIY Pine Cone Succulents and a couple ideas for crafting with them.
This project has been brewing in my head for awhile. We visited some friends in South Dakota who had pinecones all over their new yard. I happily gathered a large bag-full, hoping to come up with a fun project to make with them.
With a little google searching, I found that pinecones could be upcycled into succulents, which I found HERE. But I wasn’t excited to hand paint each one. Plus, the reason I love succulents is their subtle color; these seemed a bit bright.
THIS post had a great idea to suspend pinecones in latex paint, but they ended up looking too artificial for me.
I sound like Goldilocks and the Three Bears…this one’s too hard, this one’s too soft. Yep, I can be particular. But we each have our own idea of what’s beautiful.
I wanted realistic-looking pinecone succulents, in all their subtle-colored glory. And I wanted to be able to easily and quickly paint them, not putz around with hand brushing. Yep…I like instant gratification in my crafting.
Here’s what I came up with, and I couldn’t be more happy with the result!
Easy DIY Pinecone Succulents
For your convenience, this post contains affiliate links. If you make a purchase, I may receive a commission. There is no additional cost to you. My full privacy policy is here.
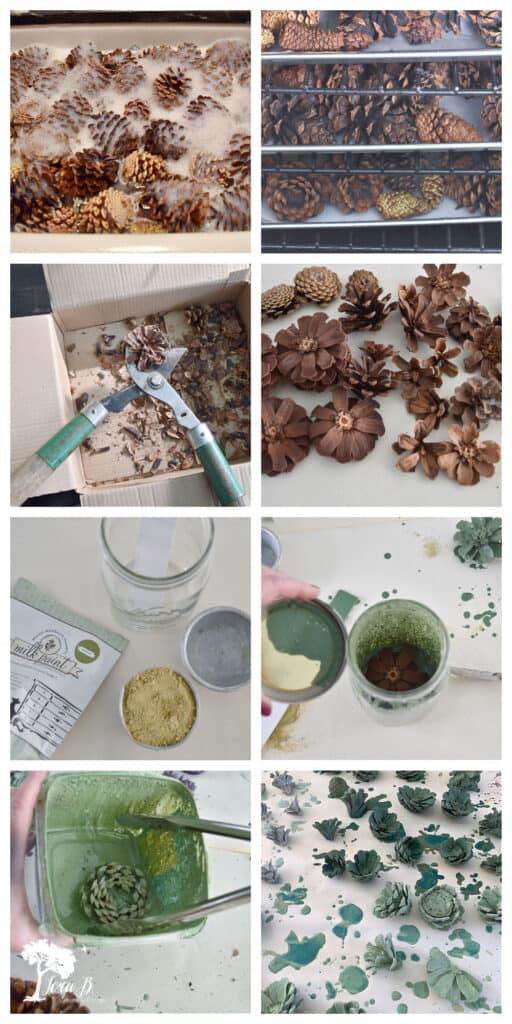
Wash and Dry Pine Cones First
How do you clean, de-bug and open pine cones for crafting and decorating? I’d never done this before, but it’s so easy. Simply plunge your pinecones into a sink full of water with dish soap and white vinegar. Soak them for 30 minutes, squishing them down and moving them around every so often. Many of them will close.
Then take them out and place on a towel. Put your oven on 200 degrees. Place the pinecones on parchment or foil lined cookie sheets and bake. The length will depend on how large your cones are. From 2 hours to 5 is a good estimate. You want them to be fully open again. When they’re done, they will look beautiful.
Cut the Pine Cones with a Bypass Pruner
Once fully dry, you can cut the pine cones into succulent shapes, using a bypass pruner. For smaller cones, a hand pruner will work, but you need the power of a big pruner with long handles to cut the larger ones. Do it in a cardboard box, because parts will fly!
Paint Pine Cones with Milk Paint
For real-looking pine cone succulents, mix up powder-based milk paint. I used Miss Mustard Seed’s Milk Paint in Boxwood, Luckett’s Green, Layla’s Mint and a mixture of Tricycle and Artissimo to get purple. (Note: Miss Mustard Seed’s Milk Paint is being reformulated; exact colors may not be available at this time. Check website via my link below for availability)
Find Miss Mustard Seed’s Milk Paints HERE. Use code 10OFFLB for a discount!
Mix the powder and water in a container large enough to fit your pine cone succulents, which also has a lid. A mason jar or food tupperware container works great. You can also put the lid on and shake to mix the paint.
Place pine cone pieces in paint, one or two at a time and shake gently. Take them out with tongs and place on parchment or foil to dry.
Here’s the Pinecone Succulent How To in Pictures:
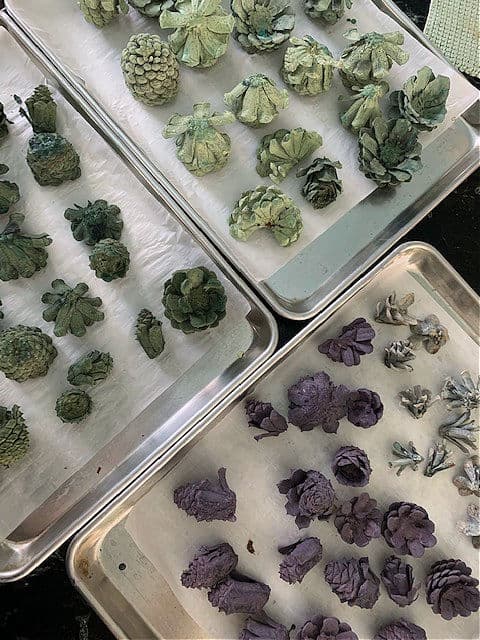
If you get impatient, like I was, you can pop them back in the oven to dry thoroughly. Then you can craft with them!
Floral Arrangement Ideas for Decor
My question of “What kind of paint do you use on pinecones?” got answered. The milk paint is thin enough to highlight all the natural texture of the pinecones, so they look like real succulents. They could be sprayed with a clear sealer, but I liked them as is.
Here are a couple fun ways to turn them into pretty decor.
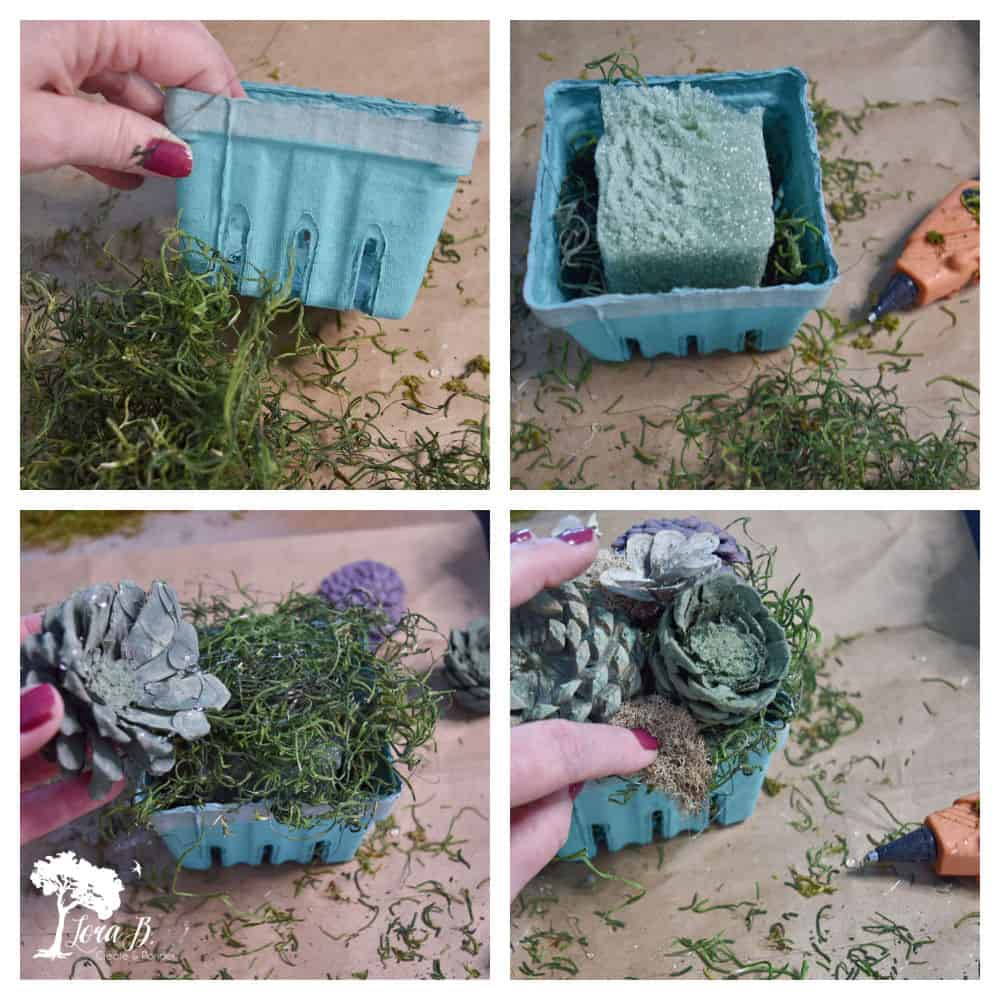
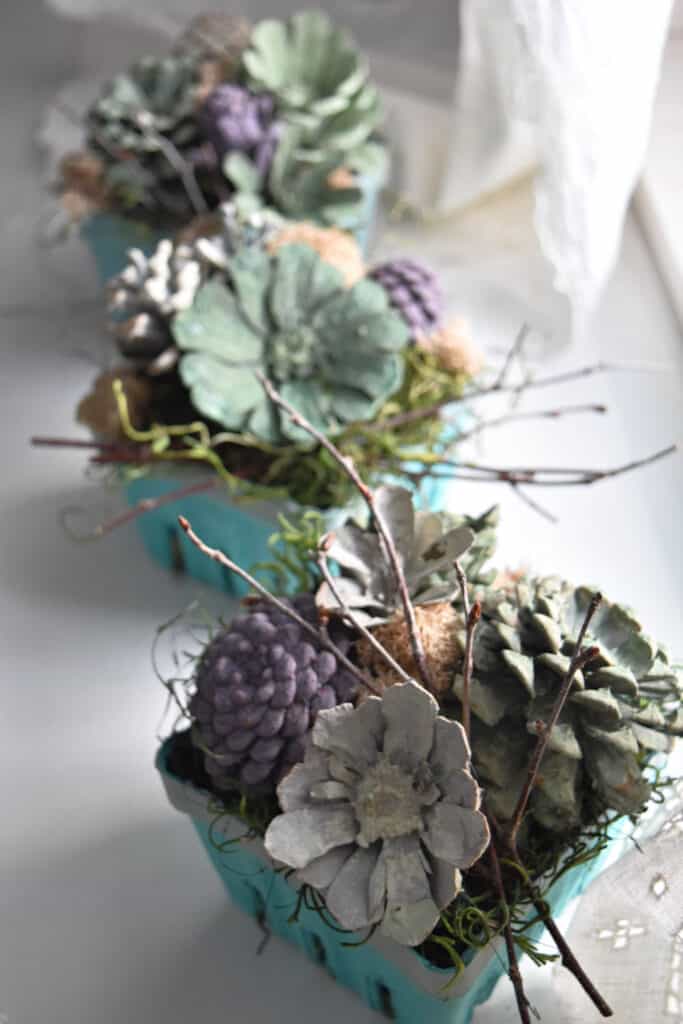
Recycled paper berry baskets (get them HERE) are the perfect size for a little succulent arrangement. Simply tuck some spanish moss in the bottom and insert a piece of styrofoam. Glue more moss on top and hot glue your pine cone succulents on top. Tuck lichen and sticks in for more texture.
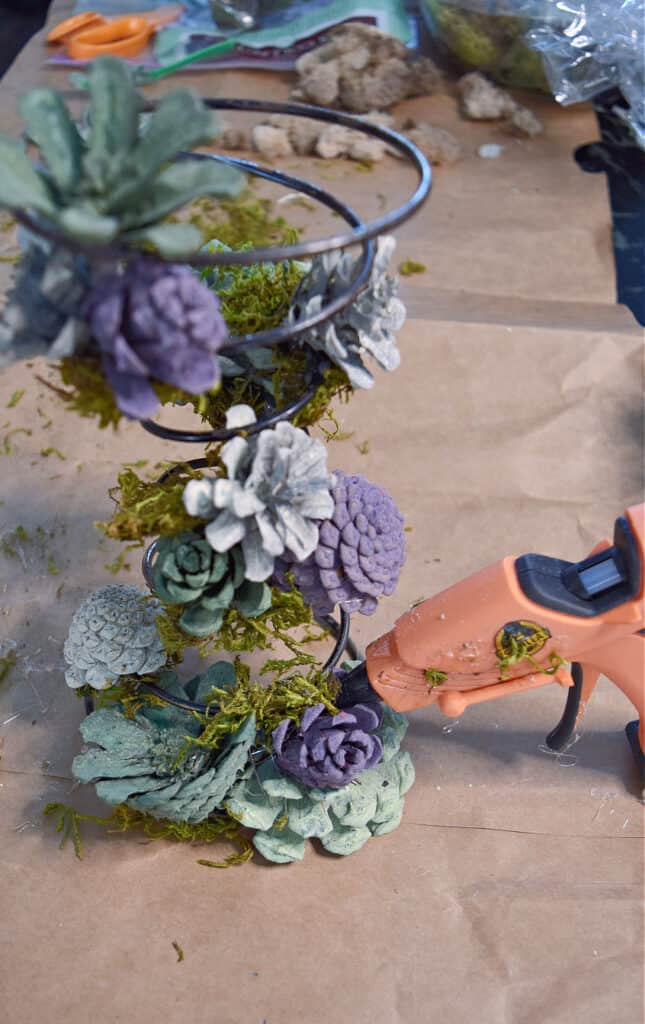
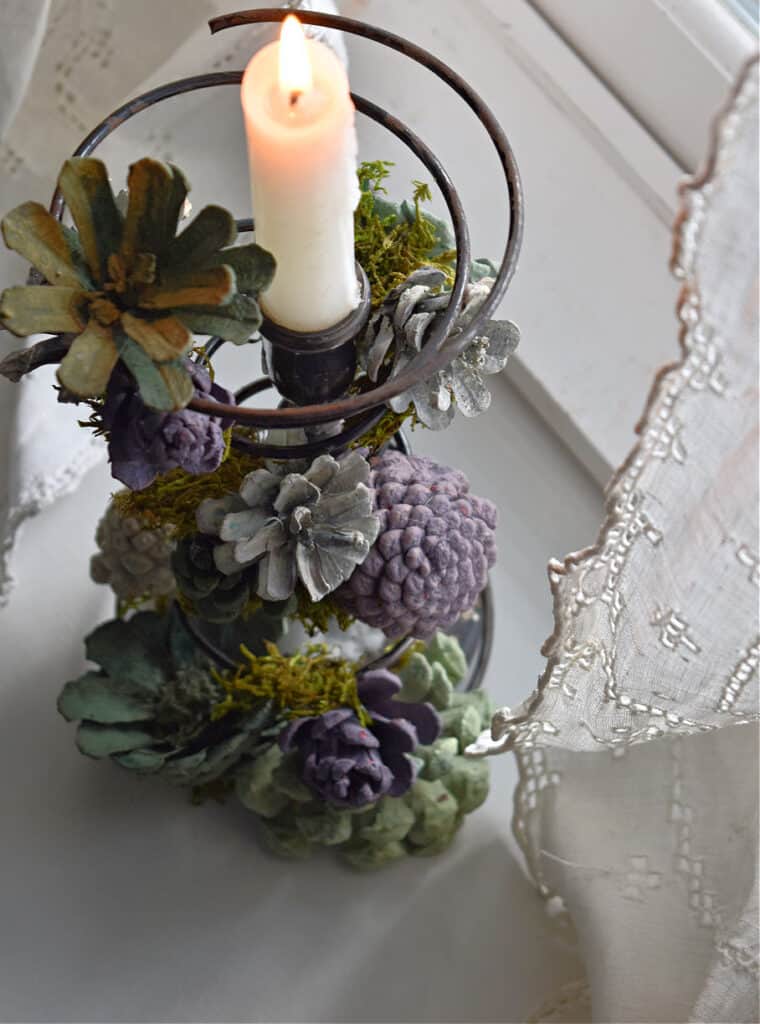
An even more unique idea is to hot glue the succulents to an old spring. Add moss bits for added texture. Place a skinny candlestick in the middle and add a faux or real candle. My new favorite faux taper candles can be found HERE.
Don’t you just love that subtle color and texture? They look so much like real succulents. I’ve got more to craft with. Maybe a wreath next?
You can find Miss Mustard Seed’s Milk Paint products HERE. Use code 10OFFLB for a discount!
For more of my DIY projects, see “25 Best DIY Spring Decor Projects”.
Hope you enjoyed these Easy DIY Pinecone Succulents!
Become an Insider to keep the ideas flowing!
Pin, share, and enjoy the rest of the #upcyclesquad Inspiration!

#upcyclesquad
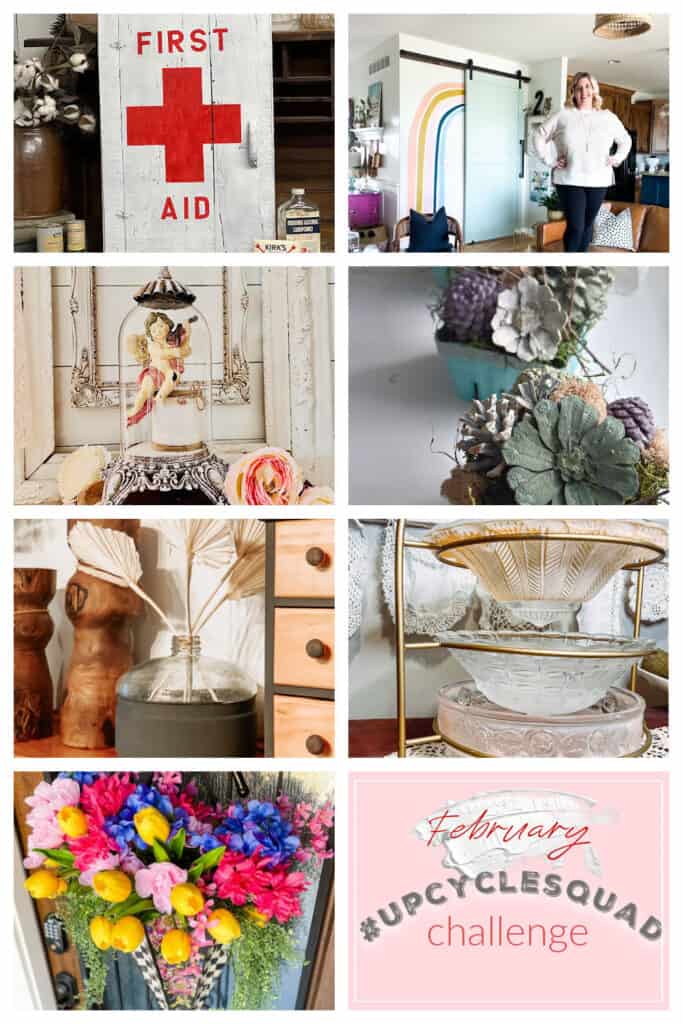
The Junk Parlor, “First Aid Cross Cabinet DIY”
H. Prall & Co, “Three Ways to Use Baskets in Your Home”
Faux Your Eyes Only, “DIY Shabby Chic Style Glass Cloche”
Southern Crush at Home, “Spring Front Door Wreath Idea”
And guests:
Custom Southern Company, “How to Repurpose Antique Light Globes”
Tenneil Register R7 Reclaimed, “Painted Glass Jugs”
Sharing at these lovely parties:
Hi, Lora! I have been enjoying your blog and those of your friends for some time. I love your “pinecones to succulents” craft project. I have been using pinecones for years to make “zinnias,” “dogwood blossoms,” and even “lavender.” I’ll send some pictures when I finish my next batch. I live in the South where pines snd other conifers are plentiful. I never thought of using them for succulents–and the berry boxes are the perfect touch-so thank you for such a cool idea!
So glad you enjoyed the ideas, Penny! Yes, I’ve seen pinecone zinnia ideas on Pinterest; love that idea. Would love to see pictures of your creations! Nature projects are always a favorite because anyone can make them:)
I love this project, Lora! I am amazed at your creativity and your fabulous pine cone succulents! I am so excited to feature your post at Tuesday Turn About. Thank you so much for sharing!!
I so appreciate that, Lynne; thank you for the feature!
How cute is that! I’ve never seen this pine cone succulent idea before. I especially love the ones in the fruit baskets.
It’s amazing how nature looks like itself!
How cool is that! Never thought of using pinecones to look like a plant! Thanks for sharing!
Oh, I’m so glad I found you!!!
These are fabulous. I particularly love the ones in the little fruit baskets.
Thanks for linking them on Fabulous Friday link party.
Glad you liked them, Diane! Thanks for hosting:)
I’ve pinned this, these are so cute and love the colors you chose, very real looking. I have already stored mine so I will wait or may go find more.
There’s always more to be found, luckily!
Oh my gosh Lora!! These look INCREDIBLE!!! The paint colors you chose make them look like actual succulents. I’m amazed. SO GOOD!!
I was pretty happy with how they turned out!
Unusual, but cute. Great job.
Thanks!
This is such a great DIY! Thank you for the inspiration!!
Thank you, Renee!
This is so perfect! I have so many pinecones left over from fall/winter projects that can be upcycyled into gorgeous faux succulents! Thank you for the inspiration!
Nice to be able to use them in different seasons!
These are so fun, Lora! What a great project! Thanks for sharing!
Excited to be able to use them for a couple other projects, too.
The berry basket is my favorite! Such a unique project. Love it so much!!
They make the perfect centerpiece:)
I am so in love with this and can not wait to try it out! Great idea!
Have fun!
Hands down one of my favorite DIY’S ever!
That’s saying a lot! Thank you:)
I love succulents and this is such a fun and unique take on them! I also love that you found a way to use pinecones after their usual “season”.
Love turning something regular into something special!